Per-device Cell tower Plus
Prerequisites
- Authentication — Bearer token required. See authorization flow.
- Device Location Credits — Active Device Location Credits must be available in your account.
- API rate limits — Review the rate limits to avoid throttling.
Understanding Cell tower Plus Modes
Basic and Plus are the two solver modes for Cell Tower Location. Basic is free. Plus is a paid upgrade (requires Device Location Credits) offering higher accuracy for 3G/4G/LTE-M.
The DEFAULT and CUSTOM configurations described below apply only to the Plus solver mode.
The Cell tower Plus setting can be in one of the following states:
- DEFAULT — Cell tower Plus applies uniformly to all devices, which follow the customer's account-wide global resolution frequency (default 60 minutes, accepted range 60–1440 minutes). This is the initial mode when the feature is first enabled.
- CUSTOM — You control which devices have their network events processed with the Plus solver, and how frequently (60–1440 minutes). The frequency determines the minimum interval at which network events from a device are picked up for location resolution. Devices without a per-device entry follow the account-wide global resolution frequency.
| Organization mode | Devices with a per-device frequency | Devices without a per-device entry |
|---|---|---|
| DEFAULT | — (no per-device entries in DEFAULT mode) | Plus resolution at the account-wide global frequency |
| CUSTOM | Plus resolution at the configured per-device frequency | Plus resolution at the account-wide global frequency |
| Disabled (no purchased credits) | Basic resolution | Basic resolution |
For how the account-wide global resolution frequency is set and read, see the Features & Limitations page and the API Examples page.
When using the API, switching to CUSTOM mode is required before enabling or disabling Cell tower Plus on individual devices. Attempting per-device operations without CUSTOM mode active results in a 403 Forbidden response. In the portal, the switch to CUSTOM mode happens automatically when you save the first per-device configuration — no manual step is needed.
Global frequency and per-device configuration
The account-wide global resolution frequency acts as the frequency floor for every device you do not configure individually.
- A device without a per-device Cell tower Plus entry follows the customer's current global resolution frequency, while a device with a per-device frequency uses that value instead and is not affected when the global frequency changes.
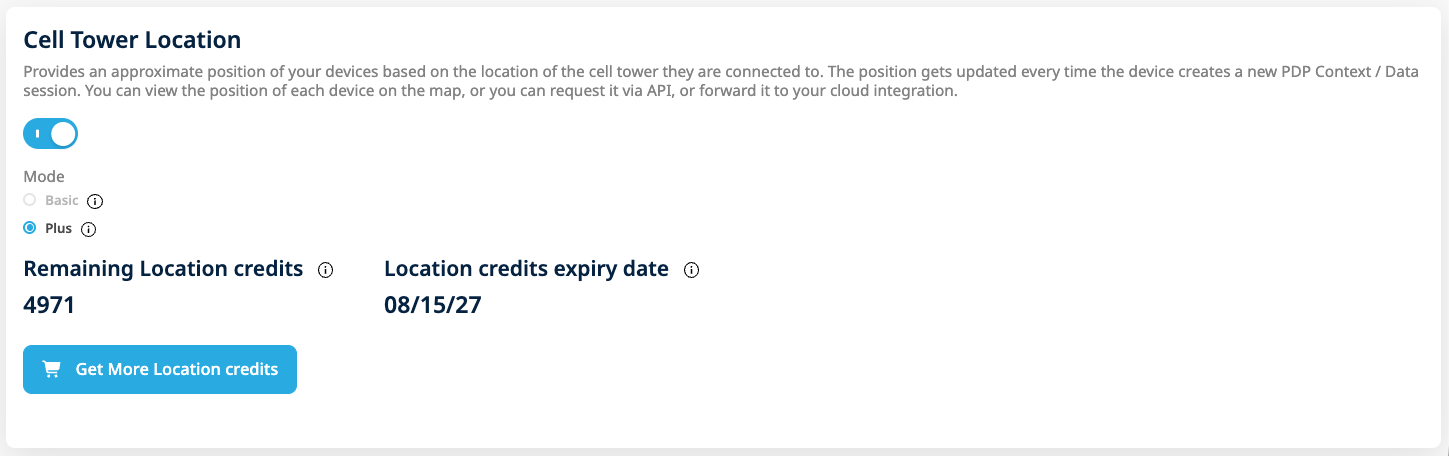
Setting the global resolution frequency in the Configuration tab
- Removing a device's per-device entry reverts that device to the current global resolution frequency rather than to no frequency — it does not stop resolving, it simply falls back to the account-wide value.
Portal — Plus Resolution Tab
The Plus Resolution tab is the fourth tab on the Device Locator page. It is always visible in the navigation regardless of the Cell tower Plus setting state.
Tab States
- Disabled state — When Cell tower Plus is not enabled or Device Location Credits are exhausted, the tab shows an informative message with a "View documentation" link. The full tab content is not accessible until Cell tower Plus is enabled for the customer.
- Enabled state — When Cell tower Plus is enabled and credits are available, the tab renders the Mode Dropdown, Manage SIMs section, and Enabled SIMs Table.
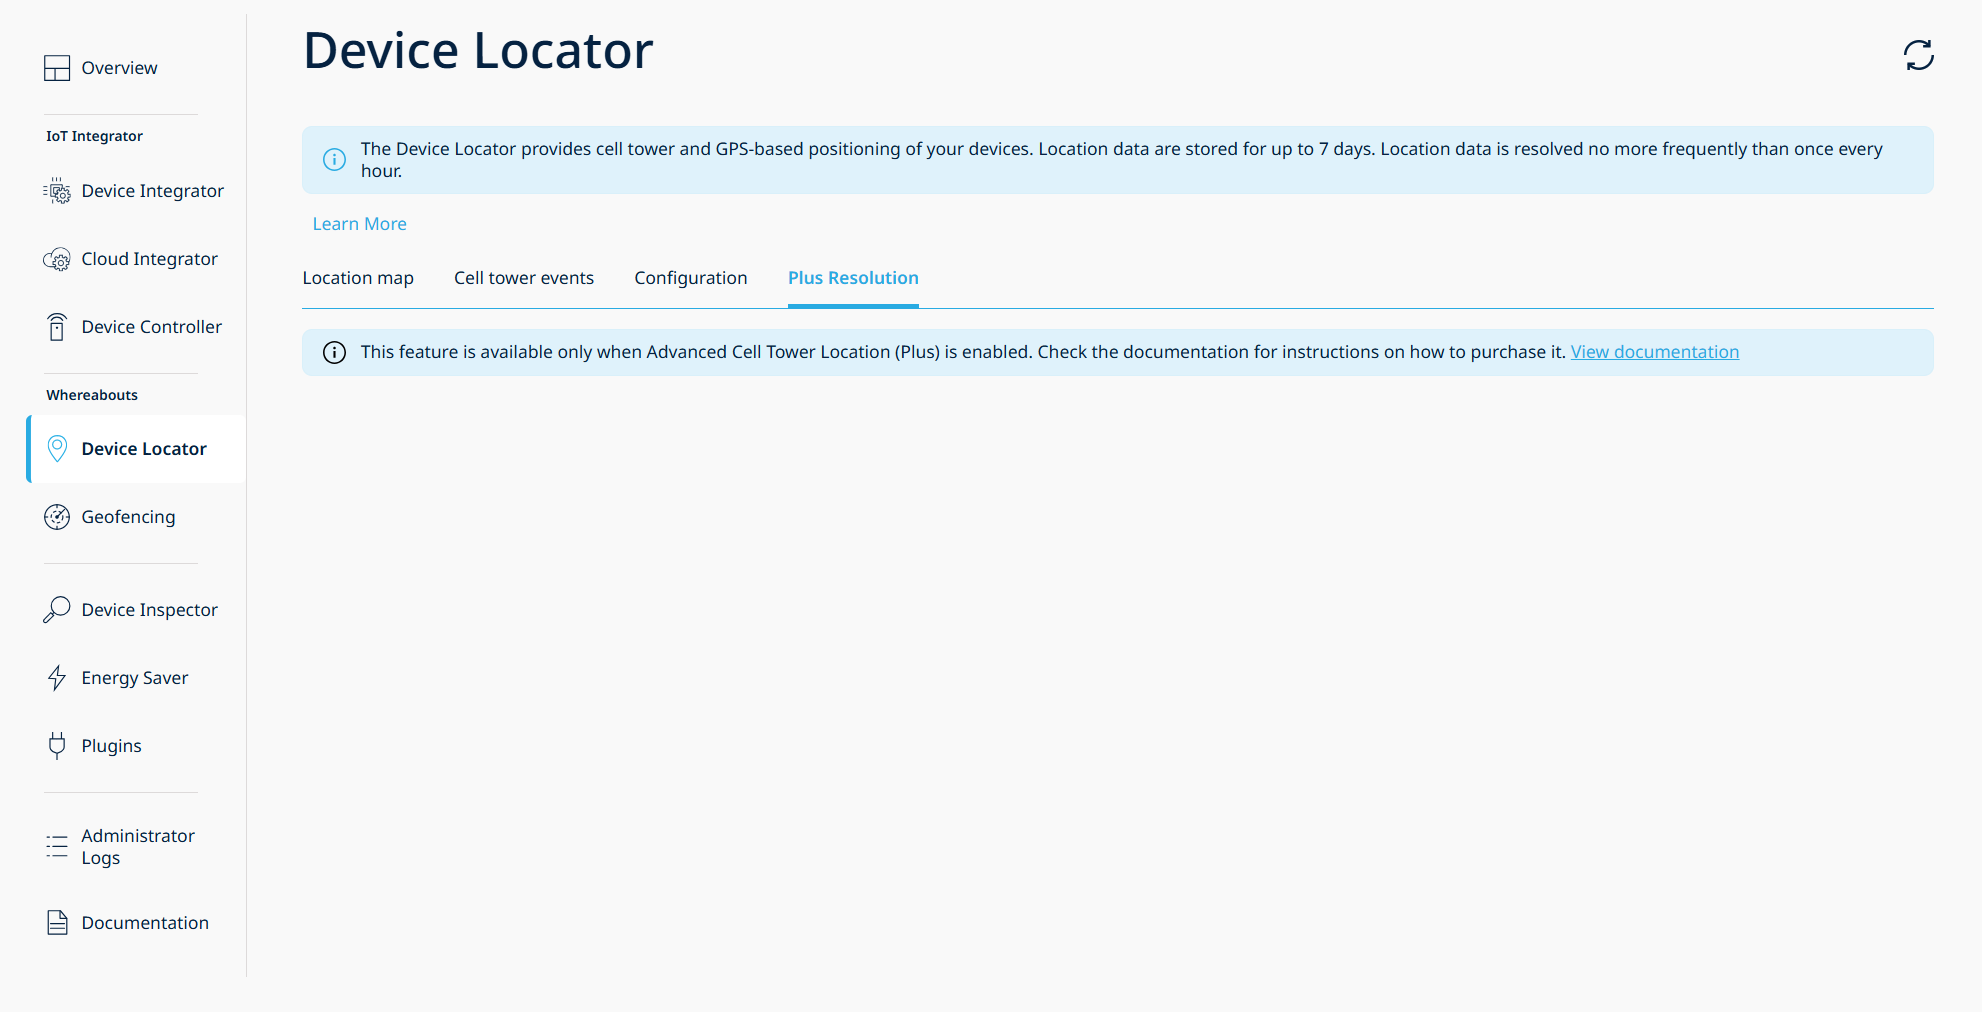
Plus Resolution tab — disabled state
A page-level refresh re-checks the Cell tower Plus setting state.
Batch Processing and Progress
When a batch operation is submitted, the portal divides the selected SIMs into sequential chunks of 100 and processes each chunk one at a time. A progress indicator is displayed during processing.
- Full success (zero failures) — A success toastr notification is displayed and the Enabled SIMs Table refreshes automatically.
- HTTP error — A toastr error notification is displayed.
- Partial failure — The Result Modal opens showing success/failure counts and the list of failed ICCIDs with a download button.
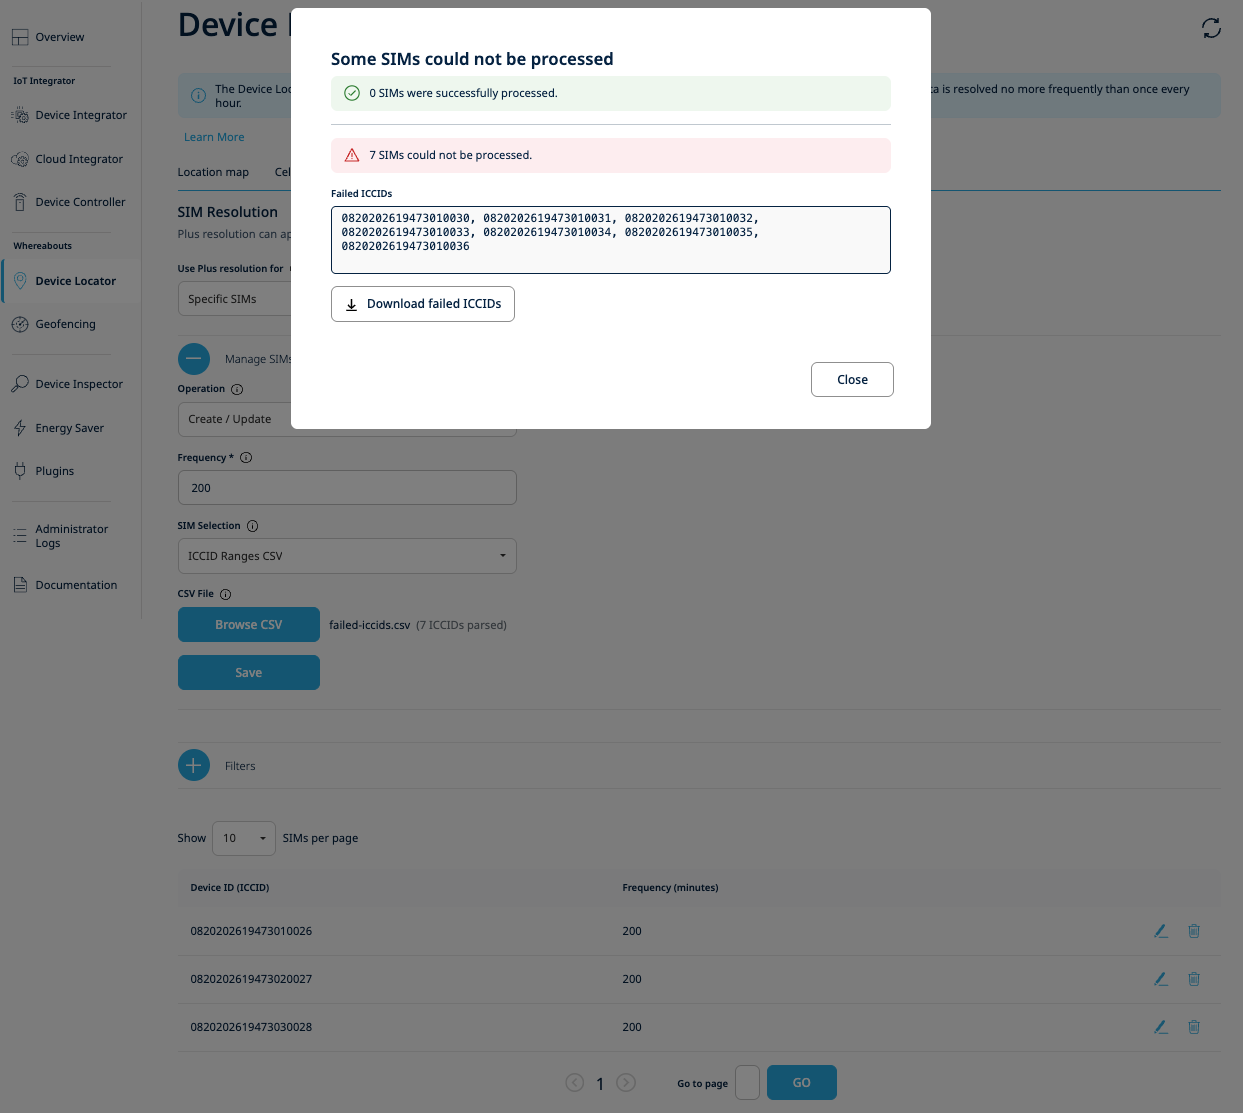
Result Modal — partial failure with downloadable failed ICCID list
The 100-device chunk size is a fixed system limit. For large CSV uploads, the portal handles chunking automatically.
Workflow
Step 1 – Switch to CUSTOM Mode
Patch the Cell tower Plus setting with {"mode": "CUSTOM"} to enable per-device configuration.
Endpoint: PATCH /v1/settings/1nceos/ADVANCED_CELL_TOWER_LOCATION/details
Via the Portal
In the Plus Resolution tab, select "Specific SIMs" from the "Use Plus resolution for" dropdown. The actual mode transition does not happen when the dropdown is changed — it occurs silently in the background when you save the first per-device configuration via the Manage SIMs section.
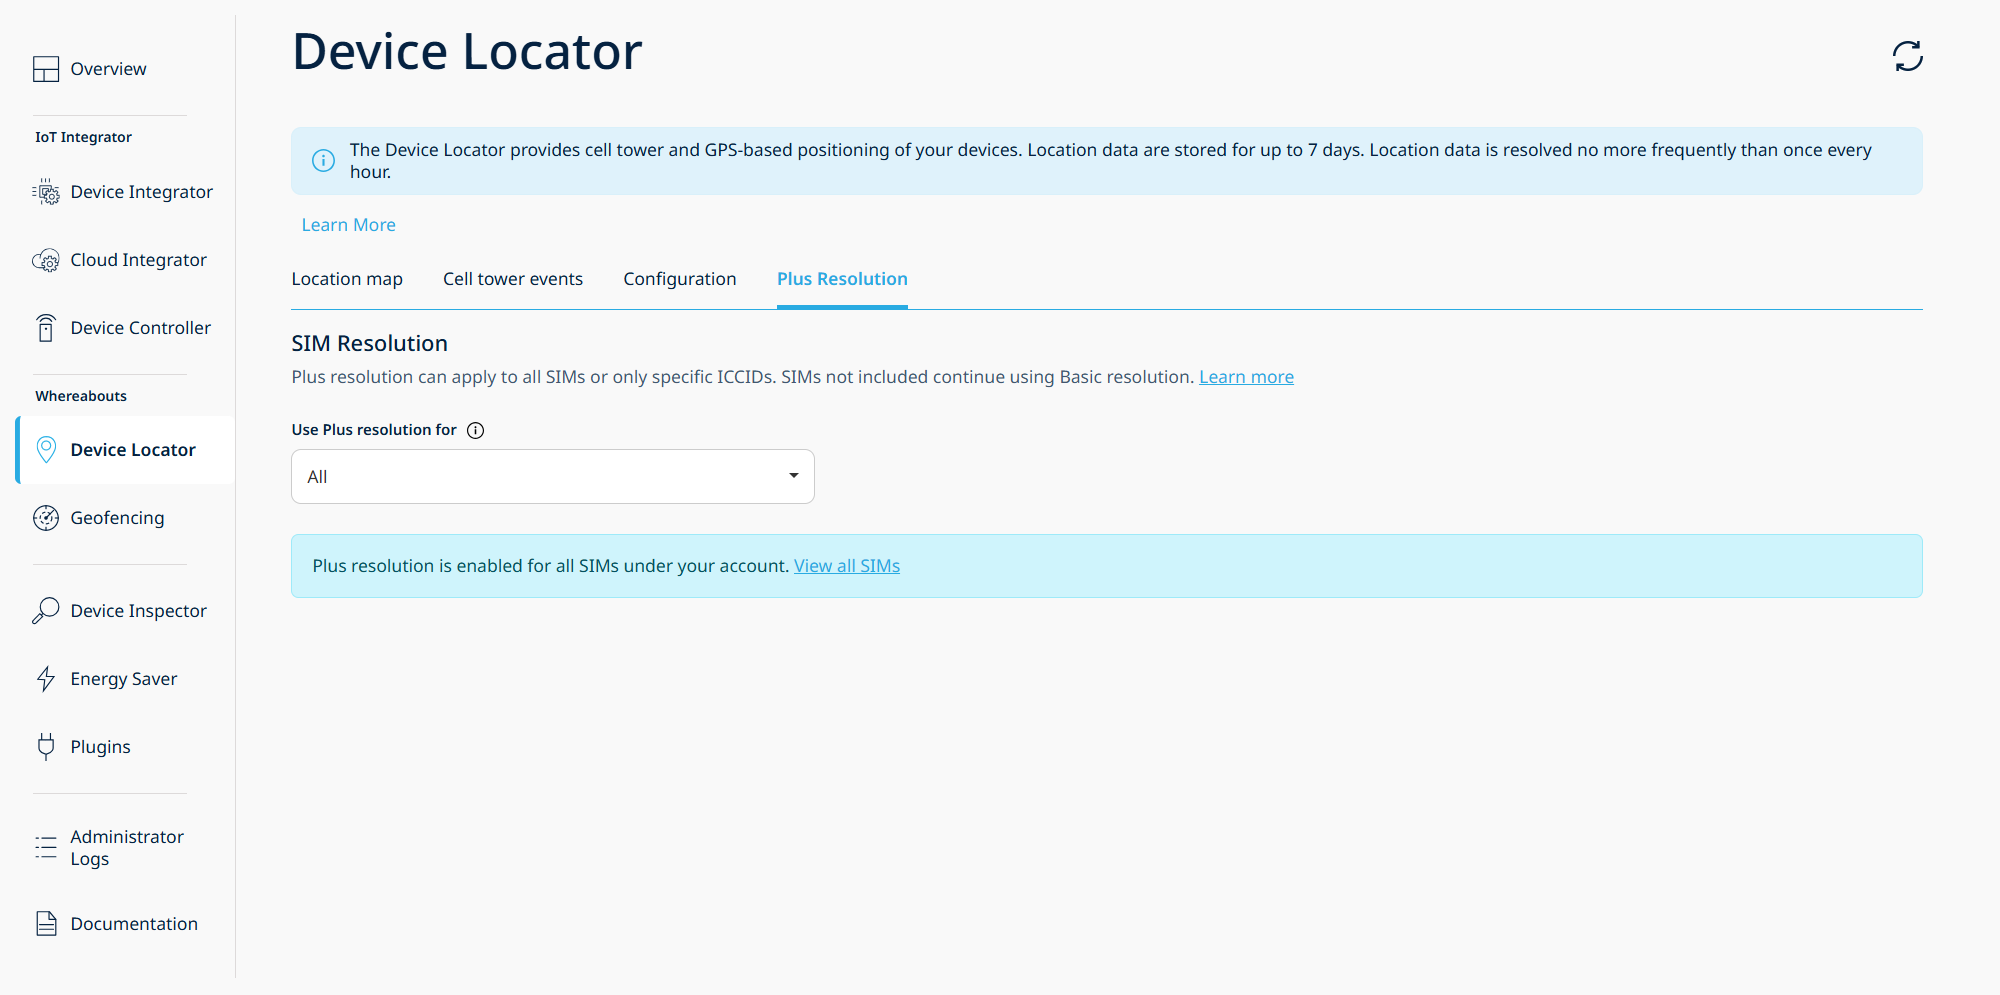
Plus Resolution tab showing the "Use Plus resolution for" dropdown
Switching from "Specific SIMs" (CUSTOM) back to "All" (DEFAULT) is not available through the portal.
Step 2 – Enable Cell tower Plus for Devices
Enable Plus resolution for selected devices by providing their ICCIDs and a frequency value.
Endpoint: POST /v1/locate/devices/settings
Via the Portal
In the Plus Resolution tab, expand the Manage SIMs section and select "Create/Update" from the Operation dropdown. Choose a SIM selection method:
- Single ICCID — enter a single 19-digit ICCID
- ICCID Range — provide start and end ICCIDs (max 100 devices)
- ICCID Ranges CSV — upload a CSV file (up to 200 KB) with comma- or semicolon-separated ICCIDs
Enter the desired frequency (60–1440 minutes) and click Save.
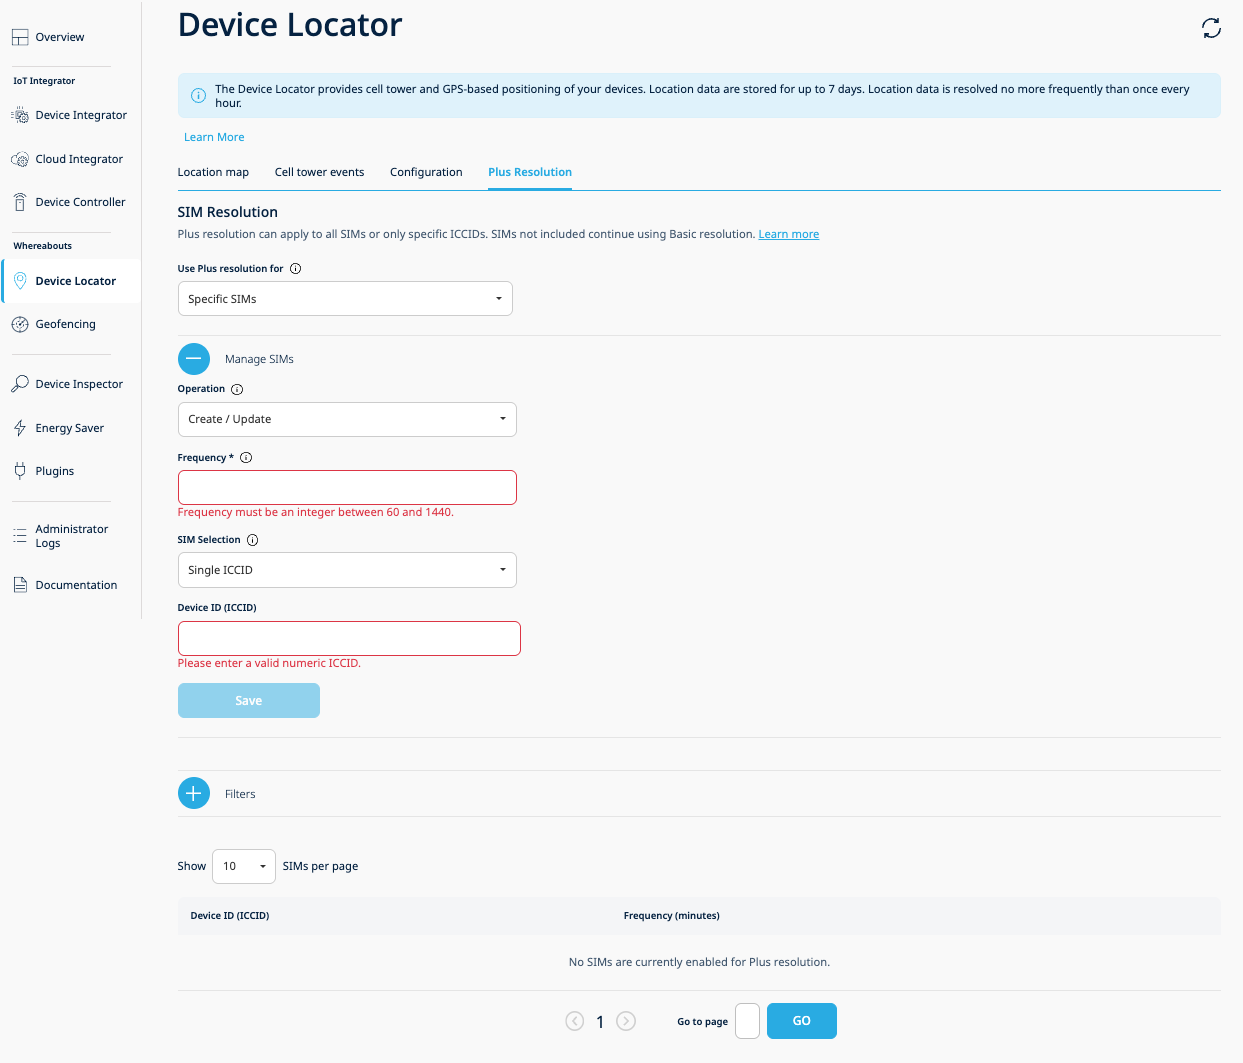
Create/Update operation with Single ICCID selection
Step 3 – Query Per-Device Settings
Retrieve which devices have per-device Cell tower Plus enabled.
Endpoint: GET /v1/inspect/devices/settings/DEVICE_ADL
Via the Portal
In the Plus Resolution tab, the Enabled SIMs Table displays all devices with per-device Plus resolution enabled. The table shows two columns: Device ID (ICCID) and Frequency.
Use the collapsible Filters section to filter by ICCID, and the page size dropdown ("Show N SIMs per page") to control how many rows are displayed. The table supports pagination with up to 50 pages.
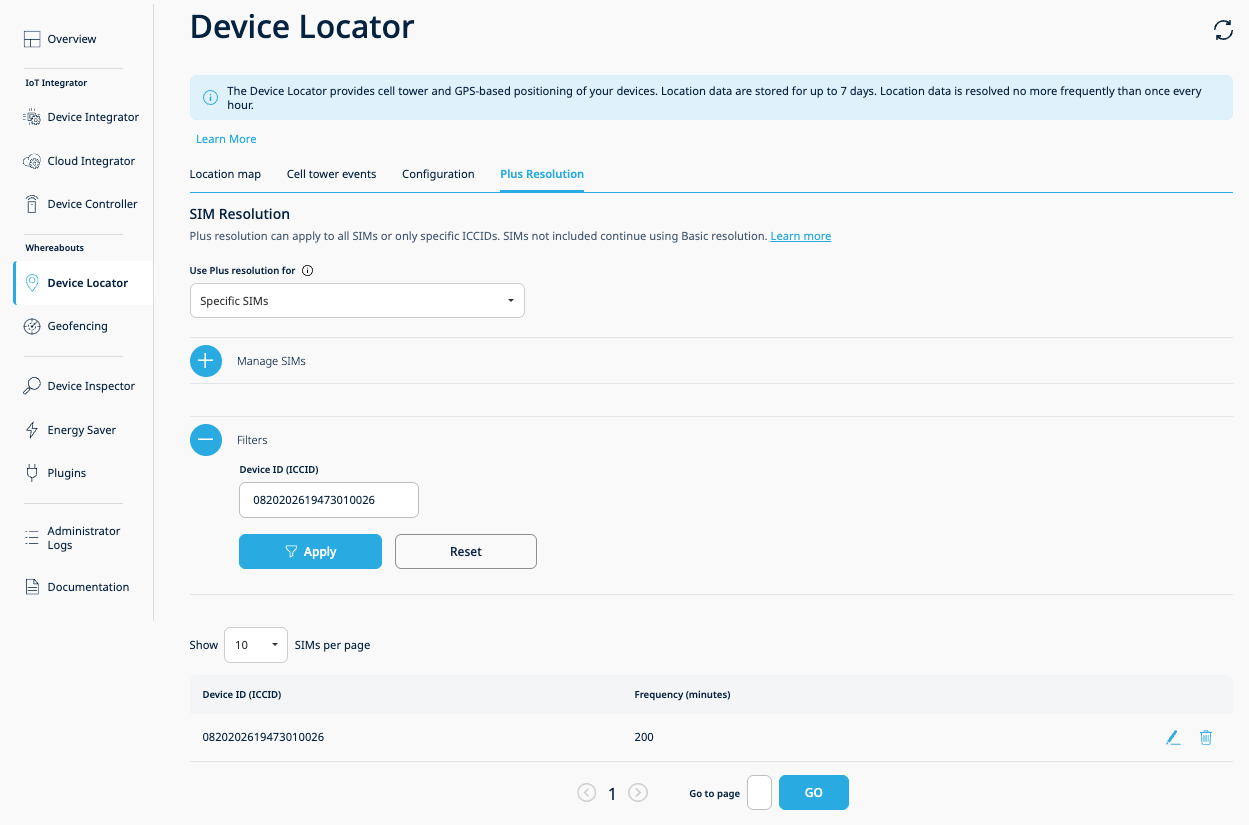
Enabled SIMs Table with filters and pagination
Step 4 – Update Device Frequency
Update the resolution frequency for devices that already have Cell tower Plus enabled. Use the same endpoint and method as enabling — submitting an existing ICCID with a new frequency value overwrites the previous configuration.
Endpoint: POST /v1/locate/devices/settings
Via the Portal
There are two ways to update device frequency in the portal:
Bulk update via Manage SIMs section — In the Plus Resolution tab, expand the Manage SIMs section with "Create/Update" selected, enter the target ICCIDs using any SIM selection method, provide the new frequency value, and click Save. Devices that already have Plus enabled will have their frequency updated to the new value.
Row-level edit from the Enabled SIMs Table — Click the edit (pencil) icon on any row in the Enabled SIMs Table. The Edit Frequency Modal opens pre-populated with the current value. Enter the new frequency (60–1440 minutes) and confirm.
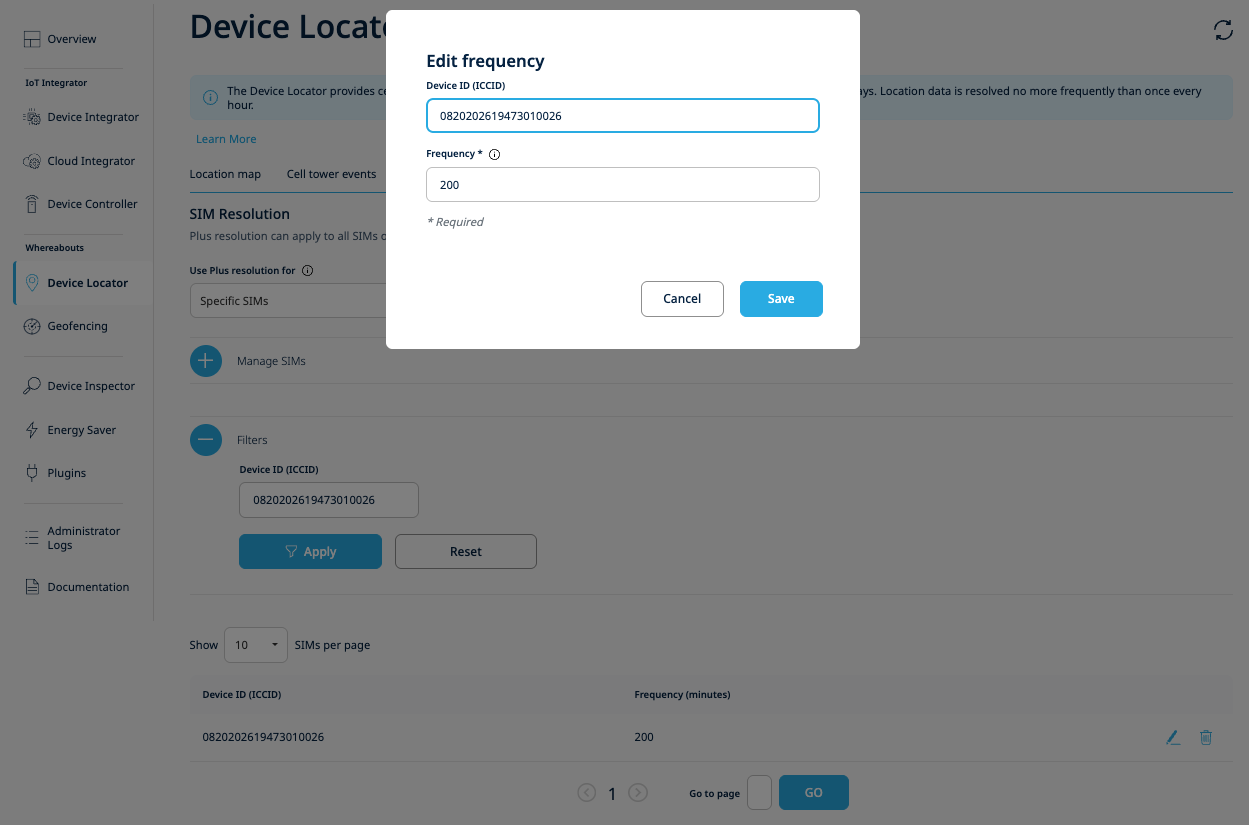
Edit Frequency modal — update the resolution frequency for a single device
Step 5 – Disable Cell tower Plus for Devices
Disable Plus resolution for selected devices.
Endpoint: DELETE /v1/locate/devices/settings
Via the Portal
There are two ways to disable Plus resolution for devices in the portal:
Bulk delete via Manage SIMs section — In the Plus Resolution tab, expand the Manage SIMs section and select "Delete" from the Operation dropdown. Choose a SIM selection method (Single ICCID, ICCID Range, or ICCID Ranges CSV), enter or upload the target ICCIDs, and click Save. The frequency input is not shown for delete operations.
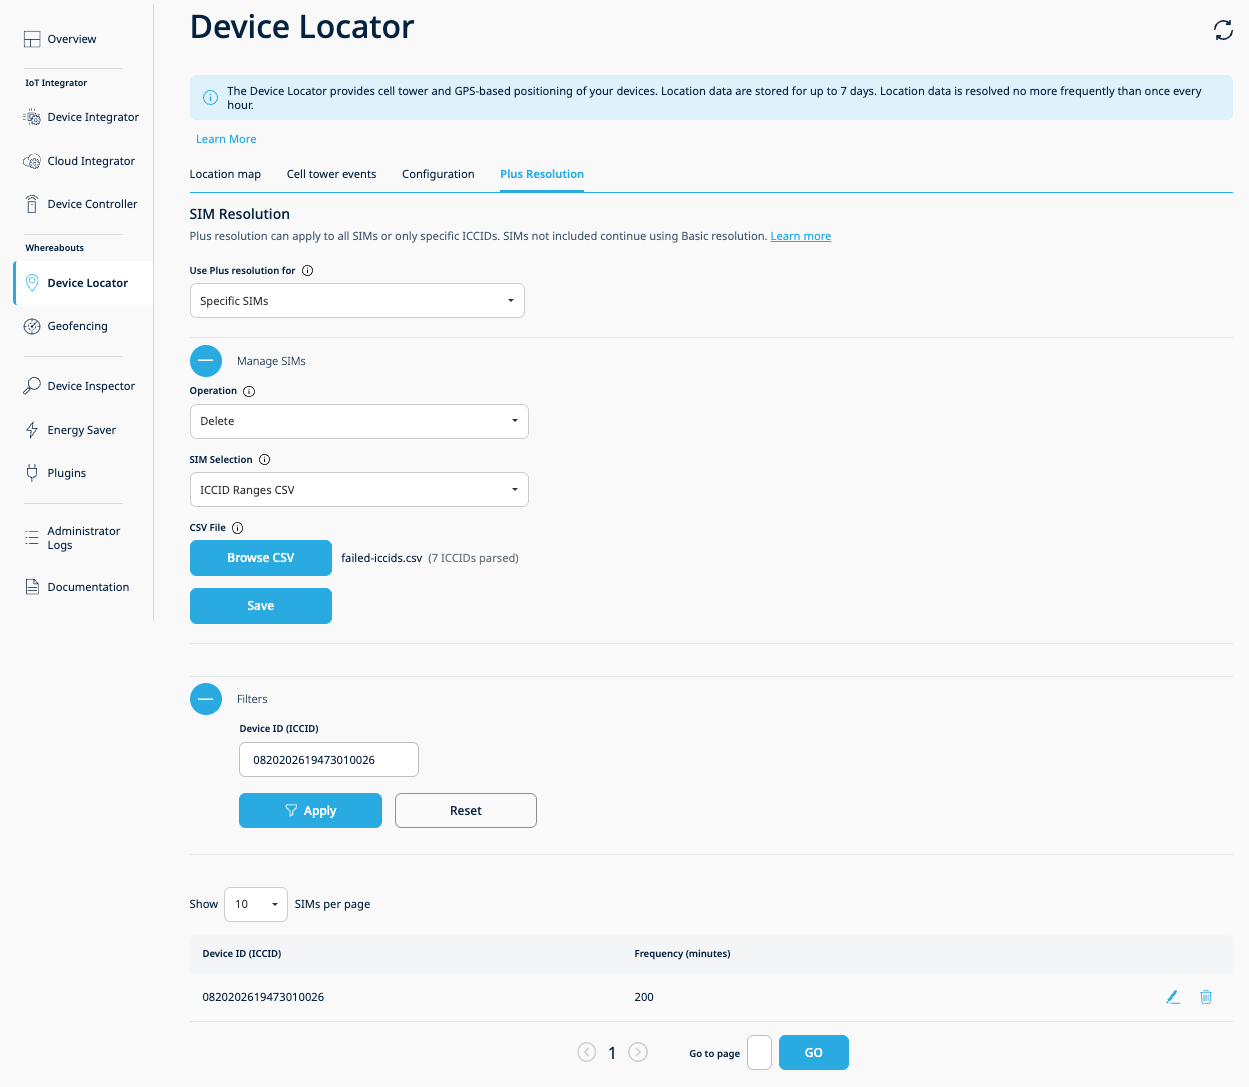
Delete operation with CSV upload showing parsed ICCID count
Row-level delete from the Enabled SIMs Table — Click the trash icon on any row in the Enabled SIMs Table. A confirmation modal asks "Are you sure you want to remove this SIM from Plus resolution?" with Cancel and Remove buttons.
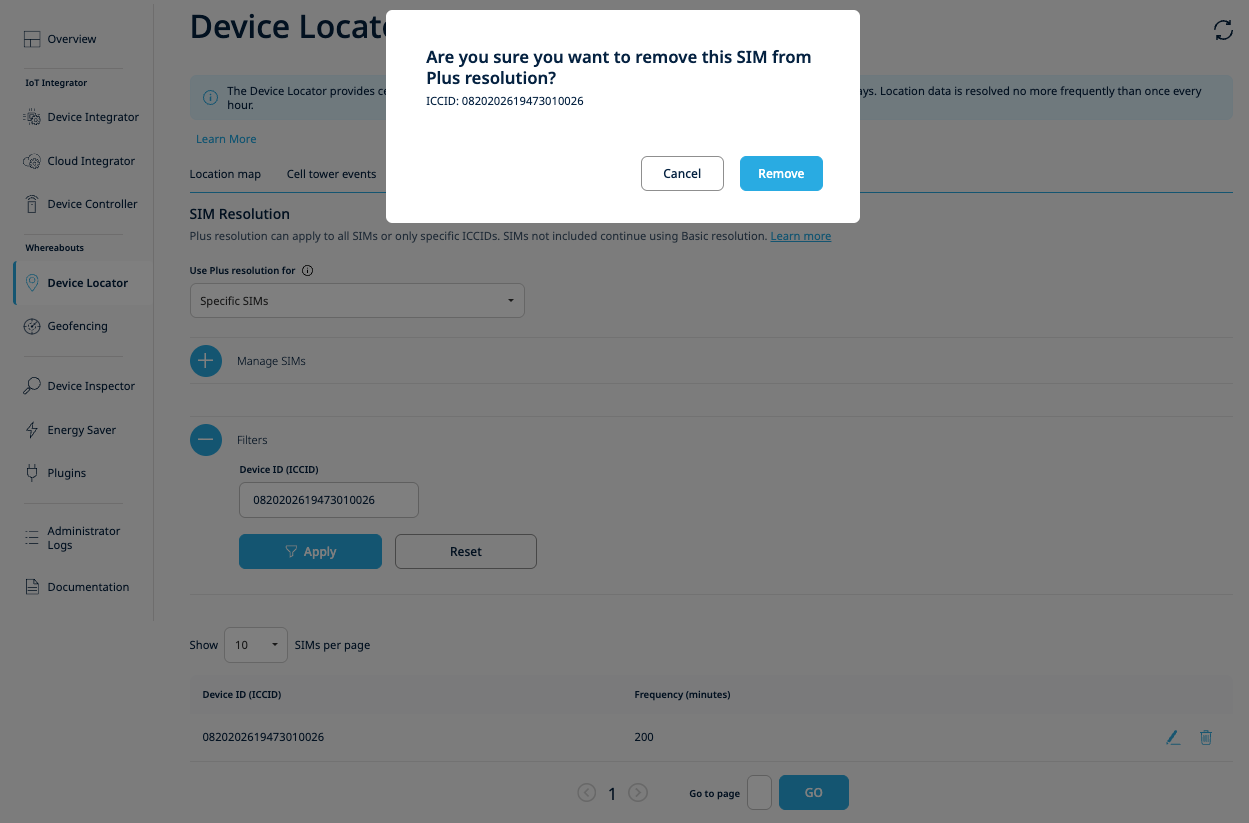
Row-level delete confirmation modal
Additional Behavior
- New SIMs — When a new SIM is activated in CUSTOM mode, it has no per-device entry and therefore follows the customer's current global resolution frequency. To give it a distinct per-device frequency, explicitly enable it via the POST endpoint or via the Manage SIMs section in the portal.
- Credits exhausted — The system falls back to the Basic resolver. Mode and per-device configurations remain intact, and Plus resolution resumes automatically when credits are replenished. Purchase additional credits via the Orders tab in the 1NCE Portal ("Whereabouts – Device Location").
- Credit debt — Deducted from the next batch of purchased credits.
- Switching back to DEFAULT — Not available via the API or the portal. When the switch is performed, all per-device frequency configurations are permanently removed.
Related Resources
- API Examples — Per-device Cell tower Plus
- Portal — Plus Resolution Tab
- Enable ADL Device Location Settings — API Explorer
- Disable ADL Device Location Settings — API Explorer
- Get Per-Device Settings — API Explorer
- Patch Setting Details — API Explorer
- Device Locator overview
- API rate limits