VPN Setup Windows
Setup 1NCE VPN with Windows Client.
The Windows platform is often used for testing on personal computers or in a Windows Server environment. This section covers the basic setup the 1NCE VPN Service on a Windows PC. Further the data routing needed for communicating between the VPN client and the 1NCE SIMs is shown. References to examples for testing and debugging the Windows VPN integrations are provided.
Please keep the xx-region-x-client.ovpn and the credentials.txt file downloaded from the 1NCE Portal at hand to get started. A current version of the OpenVPN client for Windows needs to be installed. For this please download the latest version from the OpenVPN Download Portal.
Windows Routing & Interface
Each 1NCE SIM has a fixed IP from the private IP space (RFC 1597) allocated. The connected VPN client also has a static address from the private IP space assigned. Please note that these addresses might not necessarily be from the same subnet, which has no impact on the functionality.
Pushed Routes and UpdatesThe routing for all assigned SIM IP Subnets is pushed during the initialization of the connection. If new IP spaces are assigned as a result of a larger SIM order, please restart the VPN connection to obtain the latest routes.
The customer specific traffic routing from the VPN terminating client to the specific applications/servers interfaces needs to be set up on configured by the customer and is specific to the application case. An example of IP routes pushed from the VPN server to the client are listed below. Please note that the IP addresses in the following examples are just illustrative and may not be the same as in your configuration.
A short snippet from the OpenVPN log file obtained during the start of a VPN connection using a Windows PC. It shows the routes being pushed towards the Windows system.
Notified TAP-Windows driver to set a DHCP IP/netmask of 10.64.80.2/255.255.255.252 on interface {ACF7A788-1EF1-43D2-9CE4-240945672EF6} [DHCP-serv: 10.64.80.2, lease-time: 31536000]
Successful ARP Flush on interface [14] {ACF7A788-1EF1-43D2-9CE4-240945672EF6}
MANAGEMENT: >STATE:1621401048,ASSIGN_IP,,10.64.80.2,,,,
ROUTES: 2/2 succeeded len=2 ret=1 a=0 u/d=up
MANAGEMENT: >STATE:1621401053,ADD_ROUTES,,,,,,
C:\WINDOWS\system32\route.exe ADD 10.64.0.1 MASK 255.255.255.255 10.64.80.2
Route addition via service succeeded
C:\WINDOWS\system32\route.exe ADD 10.119.x.x MASK 255.255.252.0 10.64.80.2
Tunnel Adapter of the OpenVPN connection in Windows shows the VPN client IP address. This address should be used to connect with a SIM card to the VPN client/customer server.
Connection-specific DNS suffix:
   Link-local IPv6 Address          . : fe80::xxxx:xxxx:xxxx:xxxx
   IPv4 Address  . . . . . . . . . . : 10.64.80.2
   Subnet Mask   . . . . . . . . . . : 255.255.255.252
   Default Gateway . . . . . . . . . :
Output of route print in Windows Command Line shows the current routes configured on the system. OpenVPN pushed the routes towards the SIMs after a VPN connection has been established. Please ensure that there are not local IP address conflicts within the network and SIM IP ranges.
IPv4 Routen Table
===========================================================================
Active Routes:
Network Destination        Netmask          Gateway        Interface Metric
        10.64.0.1  255.255.255.255          10.64.80.3    10.64.80.1   4506
       10.64.80.1  255.255.255.252          On-Link       10.64.80.1   4506
       10.64.80.2  255.255.255.255          On-Link       10.64.80.1   4506
       10.64.80.4  255.255.255.255          On-Link       10.64.80.1   4506
       10.119.x.x    255.255.252.0          10.64.80.3    10.64.80.1   4506
        224.0.0.0        240.0.0.0          On-Link       10.64.80.1   4506
  255.255.255.255  255.255.255.255          On-Link       10.64.80.1   4506
Connecting the VPN client on PC or server creates a separate tunnel network interface. All mobile originated and mobile terminated data traffic is sent through this tunnel interface and will be routed according to the destination IP address. When using the 1NCE VPN Service, the device with the 1NCE SIM can reach the customer VPN endpoint by addressing the static IP of the client application. In the other way, the application server can reach each individual device by addressing the static IP of the SIM.
Windows VPN Client Setup
VPN Connection LimitPlease note that only once OpenVPN client towards the 1NCE Network connection at a time can be open at any given time. If multiple OpenVPN client connect with the same credentials at the same time, the connectivity will be inconsistent and dropped. Ensure to terminate any unused OpenVPN client connection before establishing a new connection.
The Windows platform is often used for testing on personal computers or in a Windows Server environment. In this section, the configuration of the 1NCE VPN Service for the Windows Operating System is shown.
- Download the current version of the OpenVPN client for Windows. (OpenVPN Download
- Install the the OpenVPN client for Windows. Follow the default install instructions.
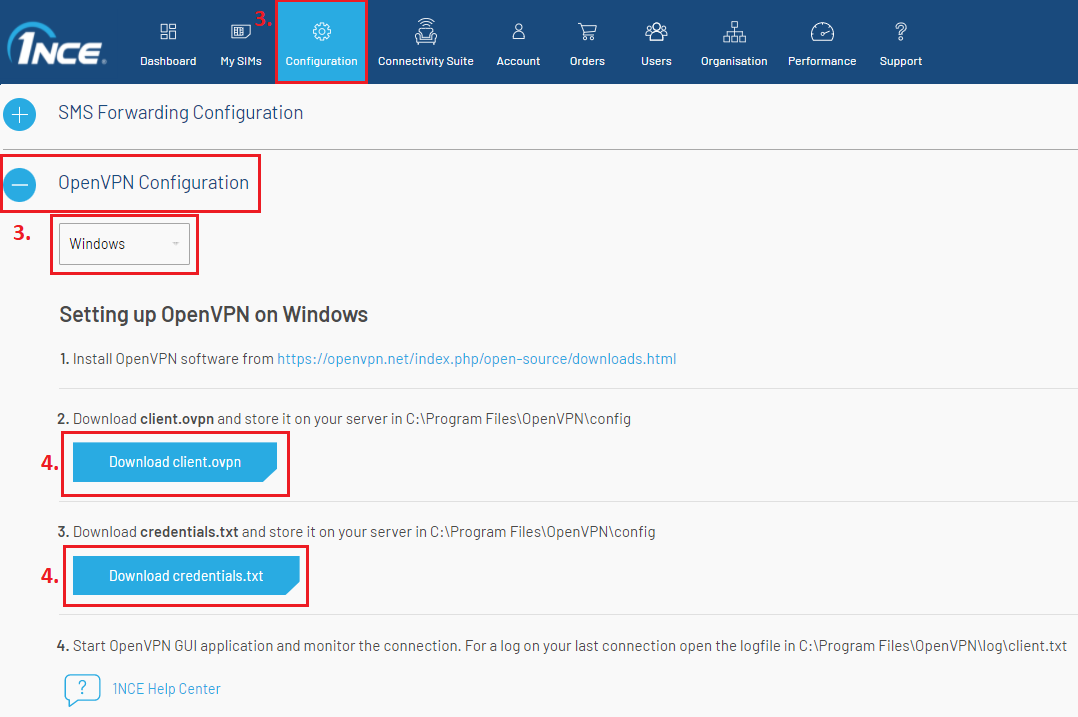
- Log into the 1NCE Portal. Navigate to the Configuration tab and open the OpenVPN Configuration dropdown. Select Windows as configuration medium and download the OpenVPN xx-region-x-client.ovpn and credentials.txt files.

Download the Configuration and Credentials from the 1NCE Portal.
- Place the xx-region-x-client.ovpn and credentials.txt in the OpenVPN configuration folder, typically C:\Program Files\OpenVPN\config.
- If required, change the path of the credentials.txt file in the xx-region-x-client.ovpn on line auth-user-pass. This is needed if the credentials file is placed somewhere else besides the default location.
- Optionally, rename the xx-region-x-client.ovpn file to make it unique in the OpenVPN user interface.
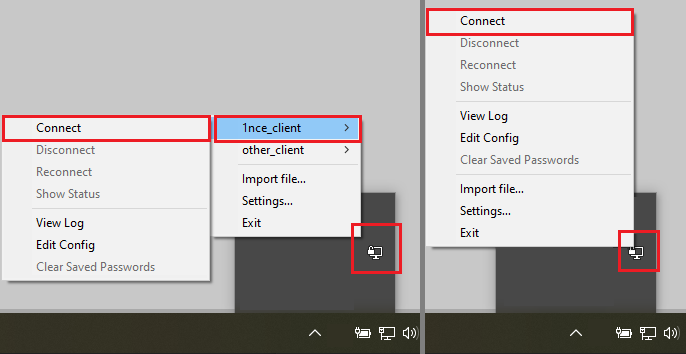
- Start the OpenVPN GUI program. Typically it will open in the task bar.
- Right click the OpenVPN Icon in the task bar menu.
- If more than one client is configured, a list of VPN connections is shown.
- Select the desired client, renamed configuration or if only one client is configured click on Connect.

Connecting to the 1NCE VPN using OpenVPN on Windows. Left, multiple configurations are present. Right, single configuration available.
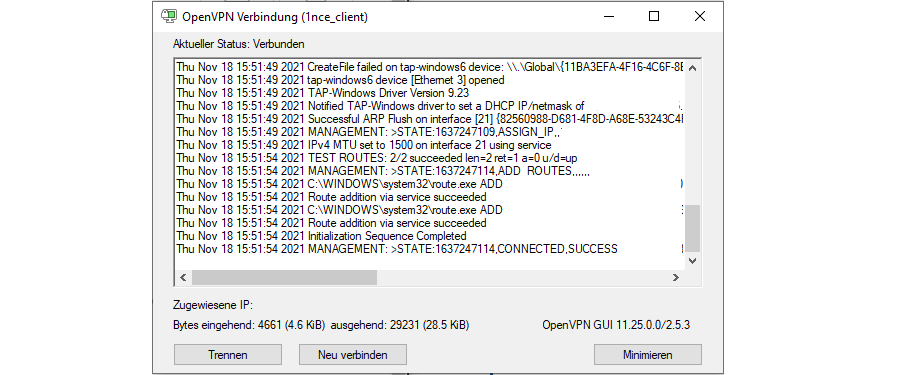
- A new pop-up will be shown for the client connecting. It shows the logs of the current connection attempt. After a few seconds the client should connect and the pop-up should be closed automatically.

Pop-up window shown during the connection establishment process of the Windows OpenVPN client.
The VPN connection can be terminated by clicking Disconnect in the OpenVPN task bar menu. If a successful connection is established, the computer should now be ready to ping and establish connection towards active/connected 1NCE SIM with an open PDP data session.
Monitoring and Logging
The 1NCE VPN Service on Windows with OpenVPN allows for easy monitoring and optional logging. This is especially useful for debugging the VPN setup in case of connectivity issues. By default, the VPN connection towards the 1NCE Network is updated once per hour. This renewal process should be logged in the monitoring. If this renewal happens very frequently, it might point towards an unstable connection or two VPN clients fighting for the same single connection.
Current Session Logs
Right click on the task tray icon and select View Log. This will bring up the log of the currently established connection. In the logs, details about the connection setup, reconnect, keep-alive and pushed routes can be found. Please always include these logs in any VPN related Support Ticket.
Extended Logging
For extended logging over longer periods of time or with a defined information granularity, the xx-region-x-client.ovpn configuration needs to be adapted. The example below shows possible configuration parameters.
The Verbosity verb<log_level> defines the amount of detail included in the log file. The default value of 3 offers a good mix between detail and abstraction. The settable range is 1 to 4. Please note that setting the log level to 4 will generate larger log files.
The path where a log file will be saved is specified by log<path_to_log_file>/openvpn.log. Please adapt the path to a valid place in Windows to store the logs.
Log files can be automatically rotated. The example shown below provides a basic starting point for weekly log file rotation. For more information please see OpenVPN Documentation.
verb <log_level>

log <path_to_log_file>/openvpn.log

<path_to_log_file>/openvpn.log {
    weekly
    rotate 12
    copytruncate
    compress
    delaycompress
    missingok
    notifempty
}
Updated 4 months ago