Zephyr Blueprint
1NCE Zephyr blueprint
🧭 Overview
The 1NCE Zephyr Blueprint is a reference application that showcases how to integrate and use various 1NCE OS features with Zephyr RTOS, including:
- ✅ Device Authenticator
- 📡 IoT Integrator
- 🔋 Energy Saver
- 📥 Device Controller for UDP and CoAP-based downlink and real-time remote interaction
- 🧩 Plugin Integrations with partners like Mender for FOTA and Memfault for device observability
It is based on the 1NCE IoT C SDK and runs on Nordic Semiconductor boards.
The Zephyr OS is a scalable, secure, real-time operating system designed for resource-constrained embedded devices — from smart sensors to full-featured gateways.
🧱 Supported Boards
The demo supports the following Nordic boards:
🚀 Getting Started
This guide walks you through:
- Setting up the 1NCE IoT C SDK
- Getting the source code
- Building and flashing the blueprint demo
📦 Prerequisites
🧩 Integrating 1NCE IoT C SDK
The 1NCE IoT C SDK provides C-based modules to easily use 1NCE OS services.
Follow these steps:
-
Open
west.yml:%HOMEPATH%\ncs\v2.8.0\nrf\west.yml -
Add the module to
name-allowlist:
Ensurence-sdkis listed in alphabetical order. -
Activate the SDK via submanifest:
Rename and edit the file:
%HOMEPATH%\ncs\v2.8.0\zephyr\submanifests\example.yamlmanifest: projects: - name: nce-sdk url: https://github.com/1NCE-GmbH/1nce-iot-c-sdk revision: main -
Run West update:
Open a terminal (e.g.,cmd.exeon Windows, Terminal on macOS/Linux) and run:cd %HOMEPATH%\ncs\v2.8.0 west update
▶️ Running the Demo
-
Clone the Blueprint Repository:
git clone https://github.com/1NCE-GmbH/blueprint-zephyr.git -
Open VS Code and Launch nRF Connect Extension
-
Add the project:
- Click Add Existing Application
- Choose the folder where the blueprint was cloned
-
Create a Build Configuration:
- Select your board target, e.g.:
nrf9160dk/nrf9160/nsnrf9151dk/nrf9151/nsthingy91/nrf9160/ns
- Select your board target, e.g.:
-
Flash the board:
- Connect your board via USB
- Click Flash or Debug to deploy the firmware
📖 Need help with board connection?
👉 Nordic Docs: Connect Using Serial Port
🧪 Testing Instructions for Thingy:91
To easily test the default setup on the Thingy:91, follow these steps using the provided binaries for the specific demo you'd like to run:
- Remove the plastic cover from the Thingy:91.
- Connect the device to your computer using a micro-USB cable.
- Enter DFU mode:
- Power off the Thingy:91.
- Hold down the black button while switching the power back to ON.
- Open nRF Connect for Desktop and launch the Programmer tool.
- Click SELECT DEVICE and choose Thingy:91 from the dropdown list.
- In the left panel, go to File > Add file > Browse and choose the appropriate
.hexfile from thethingy_binariesfolder of your desired demo. - Scroll down to Enable MCUboot and ensure it is checked.
- Click Write on the left panel, then confirm again in the MCUboot DFU pop-up by pressing Write.
- Wait for the update to finish. A message saying "Completed successfully" will confirm a successful flash.
📂 Available Firmware for Thingy:91
- 🔐 CoAP Demo Firmware
- 📡 UDP Demo Firmware
- 📥 FOTA with Mender Firmware
- 🛠️ Debug with Memfault Firmware
Note: For Memfault diagnostics and debugging, you should upload zephyr.elf file to the Memfault portal.
Refer to the Memfault documentation for instructions on setting up symbol files and debugging integration.
For a faster getting started experience, you can directly use the documentation underplugin_system/nce_debug_memfault_demo.
📘 For more detailed device guidance, check the official Thingy:91 Getting Started Guide
📚 Demos in This Blueprint
The blueprint includes the following applications:
| Demo Path | Summary |
|---|---|
nce_coap_demo | Secure CoAP communication using DTLS from Device Authenticator, with Energy Saver & Device Controller support |
nce_udp_demo | Lightweight UDP communication with compressed payloads and Device Controller |
nce_lwm2m_demo | LwM2M client for LED, buzzer, and sensor control over CoAP/DTLS with support for 1NCE Action API |
plugin_system/nce_debug_memfault_demo | Device diagnostics and crash reporting using Memfault over the 1NCE CoAP Proxy |
plugin_system/nce_fota_mender_demo | Firmware-over-the-air updates via Mender.io using the 1NCE CoAP Proxy and secure onboarding |
Sample Demos
1NCE Zephyr blueprint - UDP Demo
Overview
1NCE Zephyr UDP Demo allows customers to communicate with 1NCE endpoints via UDP Protocol, and it can send compressed payload using the Energy Saver feature.
On the Thingy:91 device, LED indicators show the following statuses:
- 🔴 RED – Connecting to the network
- 🔵 BLUE – Network connection established
- 🟢 GREEN – Message sent to 1NCE OS
⚡ Using 1NCE Energy Saver
The demo can send optimized payload using 1NCE Energy Saver. To enable this feature, add the following flag to prj.conf
CONFIG_NCE_ENERGY_SAVER=y
When enabled, the device will send compressed messages based on a translation template defined in 1NCE OS portal.
Learn more: See the 1NCE Energy Saver documentation for details on how this feature works and how to configure templates.
Tip: You can view incoming messages in the Device Inspector in the 1NCE OS portal.
Note:
Add the template located in
./nce_udp_demo/template/template.jsonto the 1NCE OS portal, and enable it for the UDP protocol to ensure correct decoding of the compressed payload.
⚙️ Configuration Options
The available configuration parameters for the UDP demo:
| Config Option | Description | Default |
|---|---|---|
CONFIG_UDP_SERVER_HOSTNAME | UDP server hostname | udp.os.1nce.com |
CONFIG_UDP_SERVER_PORT | UDP server port number | 4445 |
CONFIG_UDP_DATA_UPLOAD_FREQUENCY_SECONDS | Interval between UDP transmissions (in seconds) | 20 |
CONFIG_UDP_PSM_ENABLE | Enable LTE Power Saving Mode (PSM) | n |
CONFIG_UDP_EDRX_ENABLE | Enable LTE enhanced Discontinuous Reception (eDRX) | n |
CONFIG_UDP_RAI_ENABLE | Enable LTE Release Assistance Indication (RAI) | n |
🔋 Payload Configuration
Depending on whether the Energy Saver feature is enabled:
- If
CONFIG_NCE_ENERGY_SAVERis disabled:
| Config Option | Description | Default |
|---|---|---|
CONFIG_PAYLOAD | Message sent to 1NCE IoT Integrator | {"text": "Hi, this is a test message!"} |
- If
CONFIG_NCE_ENERGY_SAVERis enabled:
| Config Option | Description | Default |
|---|---|---|
CONFIG_NCE_PAYLOAD_DATA_SIZE | Payload data size for the Energy Saver template | 10 |
🧠 Device Controller
The Device Controller allows your device to receive CoAP downlink messages using the 1NCE Management API. It supports sending downlink requests that your device can process in real-time.
📘 More info: 1NCE DevHub – Device Controller
🔁 Sending a Request
You can trigger a downlink using the following curl command:
curl -X 'POST' 'https://api.1nce.com/management-api/v1/integrate/devices/<ICCID>/actions/UDP' \
-H 'accept: application/json' \
-H 'Authorization: Bearer <your Access Token >' \
-H 'Content-Type: application/json' \
-d '{
  "payload": "enable_sensor",
  "payloadType": "STRING",
  "port": 3000,
  "requestMode": "SEND_NOW"
}'
Replace:
<ICCID>with your SIM's ICCID<your Access Token>with your OAuth token
📩 Request Parameters
| Parameter | Description | Example |
|---|---|---|
payload | Data to send to the device | "enable_sensor" |
payloadType | Type of payload (STRING, HEX, etc.) | "STRING" |
port | UDP port to receive the message (CONFIG_NCE_RECV_PORT) | 3000 |
requestMode | Request mode (SEND_NOW or SEND_WHEN_ACTIVE) | "SEND_NOW" |
🔧 Zephyr Device Controller Configuration
To enable and handle downlink messages on your device, use the following configs:
| Config Option | Description | Default |
|---|---|---|
CONFIG_NCE_ENABLE_DEVICE_CONTROLLER | Enables the device controller feature | y |
CONFIG_NCE_RECV_PORT | UDP port to listen for incoming messages | 3000 |
CONFIG_NCE_RECEIVE_BUFFER_SIZE | Buffer size for incoming UDP payloads | 1024 |
📤 Zephyr Output Example
When the Zephyr application receives a UDP downlink from the 1NCE API:
[00:00:02.996,978] <inf> [downlink_thread] NCE_UDP_DEMO: Downlink thread started...
[00:00:02.997,802] <inf> [downlink_thread] NCE_UDP_DEMO: Listening on port: 3000
[00:00:11.325,683] <inf> [downlink_thread] NCE_UDP_DEMO: Received message: enable_sensor
📦 Ready-to-Flash Firmware for Thingy:91
We provide a prebuilt HEX file for Thingy:91 that you can flash directly to your device for quick testing.
No build setup is required — just flash and go.
👉 Download: Thingy:91 Prebuilt HEX
Note: The firmware is configured with all LTE bands enabled, which may cause a delay of several minutes during the initial network connection while scanning for available bands. This is normal.
1NCE Zephyr blueprint - CoAP Demo
Overview
1NCE Zephyr CoAP Demo allows customers to establish a secure communication with 1NCE endpoints via CoAPs after receiving DTLS credentials from Device Authenticator using the SDK. It can also send compressed payload using the Energy Saver feature.
On the Thingy:91 device, LED indicators show the following statuses:
- 🔴 RED – Connecting to the network
- 🔵 BLUE – Network connection established
- 🟢 GREEN – Message sent to 1NCE OS
Secure Communication with DTLS using 1NCE SDK
By default, the demo uses 1NCE SDK to send a CoAP GET request to 1NCE OS Device Authenticator. The response is then processed by the SDK and the credentials are used to connect to 1NCE endpoint via CoAP with DTLS.
Note: If the Pre-shared Key for DTLS is set manually, STRING format should be used.
Unsecure CoAP Communication
To test unsecure communication (plain CoAP), disable the device authenticator by adding the following flag to prj.conf
CONFIG_NCE_DEVICE_AUTHENTICATOR=n
⚡ Using 1NCE Energy saver
The demo can send compressed, optimized payloads using 1NCE Energy Saver. This reduces payload size and improves energy efficiency.
Enable in prj.conf:
CONFIG_NCE_ENERGY_SAVER=y
When enabled, the device will send compressed messages based on a translation template defined in 1NCE OS portal.
Note:
Add the template located in
./nce_coap_demo/template/template.jsonto the 1NCE OS portal, and enable it for the COAP protocol to ensure correct decoding of the compressed payload.
Learn more: See the 1NCE Energy Saver documentation for details on how this feature works and how to configure templates.
Tip: You can view incoming messages in the Device Inspector in the 1NCE OS portal.
If disabled, a plain-text message will be sent instead.
⚙️ Configuration options
The following configuration options are available for customizing the CoAP client behavior:
| Config Option | Description | Default |
|---|---|---|
CONFIG_COAP_SAMPLE_SERVER_HOSTNAME | CoAP server hostname | coap.os.1nce.com |
CONFIG_COAP_SAMPLE_SERVER_PORT | CoAP server port (5684 if DTLS enabled, otherwise 5683) | Auto |
CONFIG_COAP_URI_QUERY | URI query string used as topic parameter | t=test |
CONFIG_COAP_SAMPLE_REQUEST_INTERVAL_SECONDS | Interval between uplink messages (in seconds) | 60 |
CONFIG_NCE_DEVICE_AUTHENTICATOR | Enables device onboarding with 1NCE SDK | y |
CONFIG_NCE_UPLINK_MAX_RETRIES | Max retry attempts for uplink CoAP requests | 5 |
CONFIG_NCE_DTLS_HANDSHAKE_TIMEOUT_SECONDS | DTLS handshake timeout | 15 |
CONFIG_NCE_MAX_DTLS_CONNECTION_ATTEMPTS | Max DTLS failures before retrying onboarding | 3 |
CONFIG_NCE_DTLS_SECURITY_TAG | DTLS TAG used to store credentials on the modem | 1111 |
CONFIG_NCE_ENABLE_DTLS | Enables DTLS for secure CoAP communication. This is automatically enabled when both ZEPHYR_NCE_SDK_MODULE and NCE_DEVICE_AUTHENTICATOR are enabled. | y if ZEPHYR_NCE_SDK_MODULE && NCE_DEVICE_AUTHENTICATOR, else n |
🔋 Payload Configuration
Depending on whether the Energy Saver feature is enabled:
- If
CONFIG_NCE_ENERGY_SAVERis disabled:
| Config Option | Description | Default |
|---|---|---|
CONFIG_PAYLOAD | Message sent to 1NCE IoT Integrator | {"text": "Hi, this is a test message!"} |
- If
CONFIG_NCE_ENERGY_SAVERis enabled:
| Config Option | Description | Default |
|---|---|---|
CONFIG_NCE_PAYLOAD_DATA_SIZE | Payload data size for the Energy Saver template | 10 |
Note: The default maximum length for
CONFIG_COAP_URI_QUERYis 12 bytes.To increase this limit, set:
CONFIG_COAP_EXTENDED_OPTIONS_LEN=y
CONFIG_COAP_EXTENDED_OPTIONS_LEN_VALUE=<your_desired_length>
🧠 Device Controller
The Device Controller allows your device to receive CoAP downlink messages using the 1NCE Management API. It supports sending downlink requests that your device can process in real-time.
📘 More info: 1NCE DevHub – Device Controller
🔁 Sending a Request
Use the following curl command to send a CoAP request to your device:
curl -X 'POST' 'https://api.1nce.com/management-api/v1/integrate/devices/<ICCID>/actions/COAP' \
-H 'accept: application/json' \
-H 'Authorization: Bearer <your Access Token >' \
-H 'Content-Type: application/json' \
-d '{
  "payload": "Data to send to the device",
  "payloadType": "STRING",
  "port": <NCE_RECV_PORT>,
  "path": "/example?param1=query_example1",
  "requestType": "POST",
  "requestMode": "SEND_NOW"
}'
Replace:
<ICCID>with your SIM’s ICCID<your Access Token>with your OAuth token
📩 Request Parameters
| Parameter | Description | Example |
|---|---|---|
payload | Data to send to the device | "enable_sensor" |
payloadType | Type of payload (STRING, HEX, etc.) | "STRING" |
port | Device port to receive the message | 3000 |
path | Request path and optional query | "/example?param1=query" |
requestType | CoAP method to use (POST, GET, etc.) | "POST" |
requestMode | Request mode (SEND_NOW, SEND_WHEN_ACTIVE) | "SEND_NOW" |
🔧 Zephyr Device Controller Configuration
If CONFIG_NCE_ENABLE_DEVICE_CONTROLLER is enabled:
| Config Option | Description | Default |
|---|---|---|
CONFIG_NCE_ENABLE_DEVICE_CONTROLLER | Enables the device controller feature | y |
CONFIG_NCE_RECV_PORT | UDP port to listen for incoming CoAP messages | 3000 |
CONFIG_NCE_RECEIVE_BUFFER_SIZE | Buffer size for CoAP message handling | 1024 |
CONFIG_NCE_DOWNLINK_MAX_RETRIES | Max retry attempts for setting up downlink socket | 5 |
CONFIG_NCE_COAP_MAX_URI_PATH_SEGMENTS | Maximum number of URI path segments to support in CoAP requests | 5 |
CONFIG_NCE_COAP_MAX_URI_QUERY_PARAMS | Maximum number of query parameters allowed in CoAP requests | 5 |
⚠️ CoAP Limitations
CoAP messages — including uplink and downlink — are subject to strict option length limitations (especially for
URI-QUERYand extended paths).
Make sure to increase buffer sizes if your topic or query strings exceed the default 12 bytes using:CONFIG_COAP_EXTENDED_OPTIONS_LEN=y CONFIG_COAP_EXTENDED_OPTIONS_LEN_VALUE=<length>
📤 Zephyr Output Example
When the Zephyr application receives a CoAP message from the 1NCE API:
[00:00:02.275,817] <inf> [downlink_thread] NCE_COAP_DEMO: Downlink thread started...
[00:00:02.276,336] <inf> [downlink_thread] NCE_COAP_DEMO: Listening on port: 3000

[00:00:07.847,869] <inf> [downlink_thread] NCE_COAP_DEMO: Received 72 bytes from server
[00:00:07.847,930] <inf> [downlink_thread] NCE_COAP_DEMO: Received raw data:
                                                          48 02 1e 02 98 73 d5 1f  d7 3a 5a 1c b7 65 78 61 |H....s.. .:Z..exa
                                                          6d 70 6c 65 10 3d 08 70  61 72 61 6d 31 3d 71 75 |mple.=.p aram1=qu
                                                          65 72 79 5f 65 78 61 6d  70 6c 65 31 ff 44 61 74 |ery_exam ple1.Dat
                                                          61 20 74 6f 20 73 65 6e  64 20 74 6f 20 74 68 65 |a to sen d to the
                                                          20 64 65 76 69 63 65 0a                          | device.
[00:00:07.847,961] <inf> [downlink_thread] NCE_COAP_DEMO: CoAP Header:
[00:00:07.847,991] <inf> [downlink_thread] NCE_COAP_DEMO: Version: 1
[00:00:07.848,022] <inf> [downlink_thread] NCE_COAP_DEMO: Type: CON
[00:00:07.848,022] <inf> [downlink_thread] NCE_COAP_DEMO: CoAP Request Method: POST (0.02)
[00:00:07.848,052] <inf> [downlink_thread] NCE_COAP_DEMO: Message ID: 7682
[00:00:07.848,052] <inf> [downlink_thread] NCE_COAP_DEMO: CoAP Options:
[00:00:07.848,083] <inf> [downlink_thread] NCE_COAP_DEMO: Complete Path:
[00:00:07.848,114] <inf> [downlink_thread] NCE_COAP_DEMO: /example

[00:00:07.848,175] <inf> [downlink_thread] NCE_COAP_DEMO: CoAP Payload (binary):
                                                          44 61 74 61 20 74 6f 20  73 65 6e 64 20 74 6f 20 |Data to  send to
                                                          74 68 65 20 64 65 76 69  63 65 0a                |the devi ce.
[00:00:07.848,236] <inf> [downlink_thread] NCE_COAP_DEMO: sent ack:
                                                          68 44 1e 02 98 73 d5 1f  d7 3a 5a 1c             |hD...s.. .:Z.
[00:00:07.848,632] <inf> [downlink_thread] NCE_COAP_DEMO: CoAP ACK sent successfully
📦 Ready-to-Flash Firmware for Thingy:91
We provide a prebuilt HEX file for Thingy:91 that you can flash directly to your device for quick testing.
No build setup is required — just flash and go.
👉 Download: Thingy:91 Prebuilt HEX
Note: The firmware is configured with all LTE bands enabled, which may cause a delay of several minutes during the initial network connection while scanning for available bands. This is normal.
1NCE Zephyr blueprint - LwM2M Demo
Overview
The 1NCE LwM2M Demo enables devices to communicate with 1NCE endpoints using the LwM2M protocol over CoAP, with optional DTLS for secure messaging. It supports control of LEDs, buzzers, sensors, and other objects via LwM2M standard object models.
On the Thingy:91 device, LED indicators show the following statuses:
- 🔴 RED – the device is currently connecting to the network
- 🔵 BLUE – the device is currently bootstrapping
- 🟢 GREEN (10 seconds) – the device is registered with 1NCE LwM2M server
✅ Supported Objects for LwM2M Actions
🔗 LwM2M actions can be tested using the 1NCE Action API or from the device controller tab in 1NCE OS UI.
| Object | Path(s) | Description | Supported Boards |
|---|---|---|---|
| Light Control | /3311/0/5850 (1 Thingy:91 LED) /3311/<0–3>/5850 (4 DK LEDS) | Boolean: LED on/off | All boards |
| Light Color | /3311/0/5706 | RGB LED color in HEX (e.g., 0xFF0000) | Thingy:91 only |
| Buzzer | /3338/0/5850 | Boolean: Audible alert | Thingy:91 only |
⚙️ Configuration Options
🔐 Authentication & Server Setup
| Config Option | Description | Default |
|---|---|---|
CONFIG_NCE_ICCID | ICCID used as endpoint name and device identity | "" |
CONFIG_NCE_LWM2M_BOOTSTRAP_PSK | Pre-shared key in HEX for bootstrap/auth | "" |
CONFIG_LWM2M_CLIENT_UTILS_SERVER | LwM2M server URI (e.g., coaps://lwm2m.os.1nce.com:5684) | - |
CONFIG_LWM2M_CLIENT_UTILS_BOOTSTRAP_TLS_TAG | Security tag for bootstrap server (credentials storage) | 1111 |
CONFIG_LWM2M_CLIENT_UTILS_SERVER_TLS_TAG | Security tag for main server (replaced after bootstrap) | 1112 |
CONFIG_LWM2M_ENGINE_DEFAULT_LIFETIME | Default LwM2M Server lifetime (in seconds) | 180 |
📌 The PSK (Pre-Shared Key) must match the credentials registered using the 1NCE PSK API
The PSK must be provided in HEX format, not plain text.
💡 Example:
If your desired PSK is the string KeyPass123, you must convert it to its hexadecimal representation.
Conversion:
- Input string:
KeyPass123 - HEX format:
4b657950617373313233
Use this HEX value (4b657950617373313233) when setting CONFIG_NCE_LWM2M_BOOTSTRAP_PSK.
✅ Tools for conversion:
- Online: RapidTables String to Hex
- Terminal (Linux/macOS):
echo -n 'KeyPass123' | xxd -p
🔓 Unsecured LwM2M (Testing Only)
To run without DTLS (e.g., during integration testing):
CONFIG_LWM2M_DTLS_SUPPORT=n
CONFIG_LWM2M_CLIENT_UTILS_SERVER="coap://lwm2m.os.1nce.com:5683"
🧩 Feature Modules
Input Controls
| Module | Description | Condition |
|---|---|---|
CONFIG_APP_PUSH_BUTTON | Enable push button support (Object 3347) | All boards: • Thingy:91 (1 button) • nRF9160 DK & nRF9151 DK (2 buttons) |
CONFIG_APP_ONOFF_SWITCH | Enable on/off switch input support (Object 3342) | DK boards only: • nRF9160 DK (2 switches) • nRF9151 DK (Buttons 3 and 4 are used as switches) |
Main LwM2M Resources for Push Button and On/Off Switch Objects
| Resource ID | Name | Type | Description |
|---|---|---|---|
5500 | Digital Input State | Boolean | true if pressed/on, false if released/off |
5501 | Digital Input Counter | Integer | Number of times the button/switch has toggled |
5518 | Timestamp of Last Change | Time | Time of the last change (press/release or on/off toggle) |
💡 Note:
- Resource values can be monitored by sending an
observe-startrequest to the relevant object (e.g.,/3347) using 1NCE OS device controller.
Output Controls
| Module | Description | Condition |
|---|---|---|
CONFIG_APP_LIGHT_CONTROL | Enable LED output (Object 3311) | All boards |
CONFIG_APP_BUZZER | Enable buzzer output (Object 3338) | Thingy:91 only |
🧾 Device Identity
Set device manufacturer and type:
CONFIG_APP_MANUFACTURER="Nordic Semiconductor ASA"
CONFIG_APP_DEVICE_TYPE="OMA-LWM2M Client"
💡 Notes:
- Those values are stored in the
/3/0/0and/3/0/17resources of the device object. - The device object is not included in passive reporting, but it can be retrieved by sending a
Readrequest to object/3using 1NCE OS device controller.
🔧 Logging
Configure log levels for the application:
CONFIG_APP_LOG_LEVEL_INF=y
CONFIG_LOG=y
1NCE Zephyr blueprint - 1NCE FOTA Mender Demo
Overview
The 1NCE FOTA Mender Demo enables firmware-over-the-air (FOTA) updates through Mender.io using the 1NCE CoAP Proxy for secure and efficient communication. The device securely connects, authenticates, checks for firmware updates, downloads new versions, and updates itself.
On the Thingy:91, the LED colors indicate the following statuses:
- ⚪ Flashing White – Connecting to the network
- 🟢 Solid Green – Firmware version 1 running
- 🟡 Flashing Green / Flashing Blue – Firmware is being downloaded
- 🔵 Solid Blue – Firmware version 2 running
📟 Development Kits (nRF9160DK / nRF9151DK)
While the firmware is being downloaded, the DKs show a circular LED pattern across the four LEDs:
- 🔄 LEDs 1 → 2 → 3 → 4 blink in sequence, repeating until the download is complete.
Mender Integration
This demo requires the 1NCE Mender Plugin to be installed and enabled.
You can use prebuilt binaries and artifacts for quick testing.
Running the demo
1️⃣ Build & Flash
Flash the demo to the board using VS Code or nRF Connect for Desktop:
-
For Thingy:91, use nRF Connect Programmer.
-
For nrf9151DK & nrf9160DK, the firmware can be flashed directly from VS Code.
Windows Path Length Warning
On Windows, long file paths may cause build errors during the demo compilation.
👉 To avoid this issue, move the project folder to a shorter path such as:C:\dev\fota_mender_demo
2️⃣ Accept the Device in Mender
When starting the demo for the first time, the device will attempt to register with the Mender server.
🛡️ Manual Approval Required:
You must manually accept the device in the Mender Dashboard before it can receive any updates.
🔁 After acceptance:
- The device will periodically check for firmware updates
- Its inventory (such as IMEI, artifact name, and device type) will be updated in the Mender dashboard
You can view this info under the Devices section after the device is authorized.
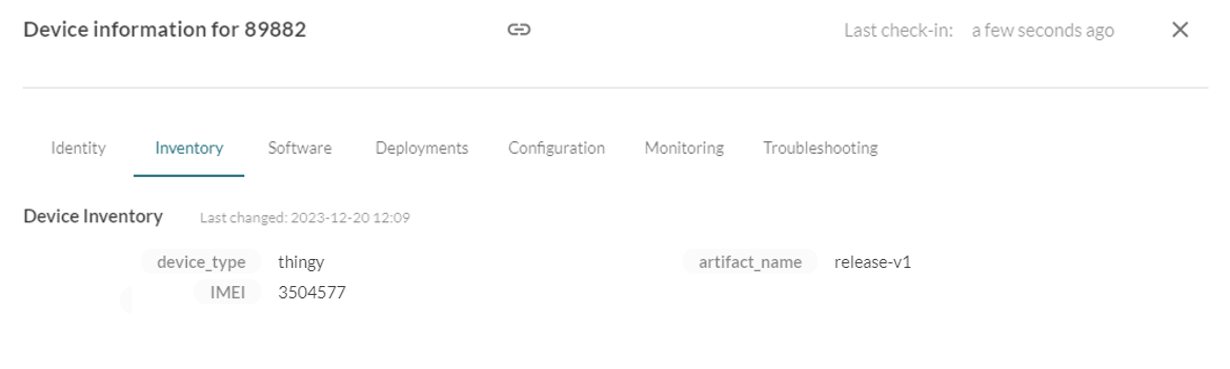
Device listed in Mender dashboard after acceptance.
3️⃣ Bump Version & Rebuild
To simulate a firmware update:
- Open your
prj.conffile - Update the following configuration options to reflect the new version:
CONFIG_APPLICATION_VERSION=2
CONFIG_ARTIFACT_NAME="release-v2"
- Rebuild the firmware using your preferred method (e.g., west build, VS Code)
4️⃣ Create & Upload Mender Artifact
📦 Firmware updates in Mender are distributed as artifacts.
🛠️ Create Artifact with mender-artifact
mender-artifact-
Install the Mender Artifact Tool
-
Run the following command to generate a new artifact:
Replace the placeholders with your actual values.
mender-artifact write module-image \
  -t thingy \
  -o release-v2.mender \
  -T release-v2 \
  -n release-v2 \
  -f build/nce_fota_mender_demo/zephyr/zephyr.signed.bin \
  --compression none
📌 Replace values as needed for your device:
-t: Device type (CONFIG_MENDER_DEVICE_TYPE)-n: Artifact name (CONFIG_ARTIFACT_NAME)-T: Payload type (e.g. release-v2)-f: Firmware binary file path (usuallybuild/nce_fota_mender_demo/zephyr/zephyr.signed.bin)
- Upload the generated
.menderfile to the Releases section in the Mender dashboard.
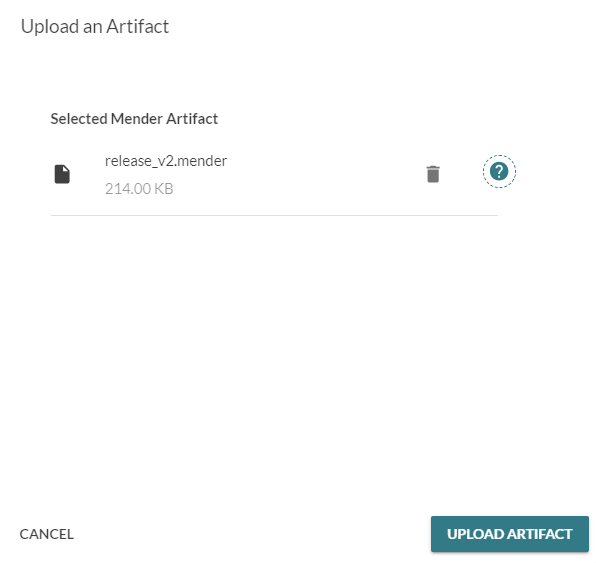
Upload the new artifact to the Releases section.
5️⃣ Deployment Creation
Once your artifact is uploaded to the Mender Releases section, you're ready to deploy it to your device(s).
- Navigate to the Deployments tab in the Mender dashboard.
- Click Create Deployment and follow the wizard:
- Select the target device or device group.
- Choose the artifact you previously uploaded.
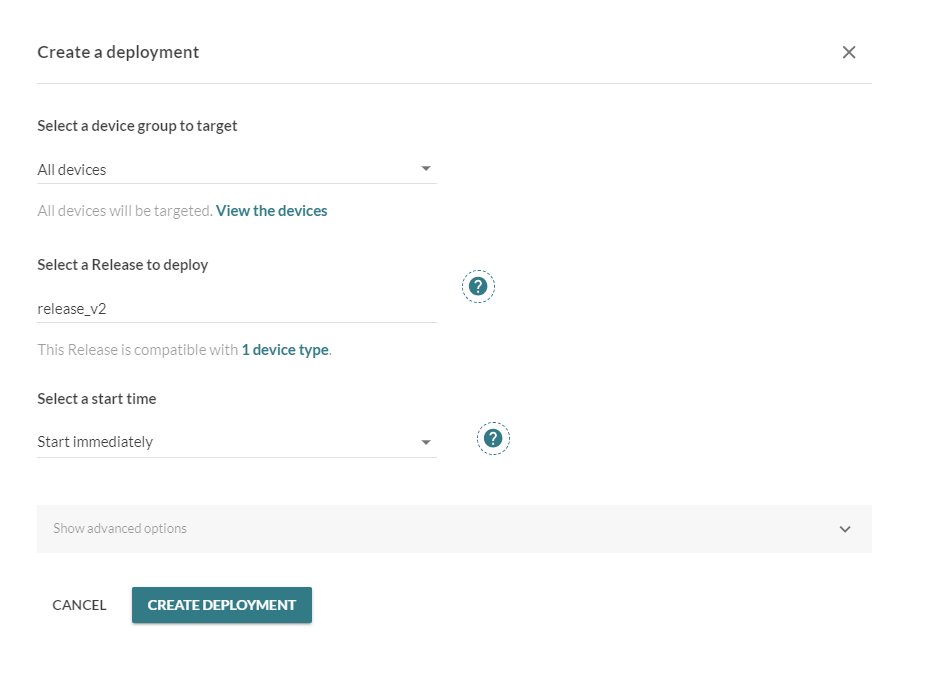
Create a deployment in the Mender dashboard.
🚦 Deployment Status Flow
After creation, the deployment will appear in the list with an initial status of pending.
As your device contacts the Mender server, the status will progress automatically:
pending → downloading → rebooting → installing → success ✅ / failure ❌
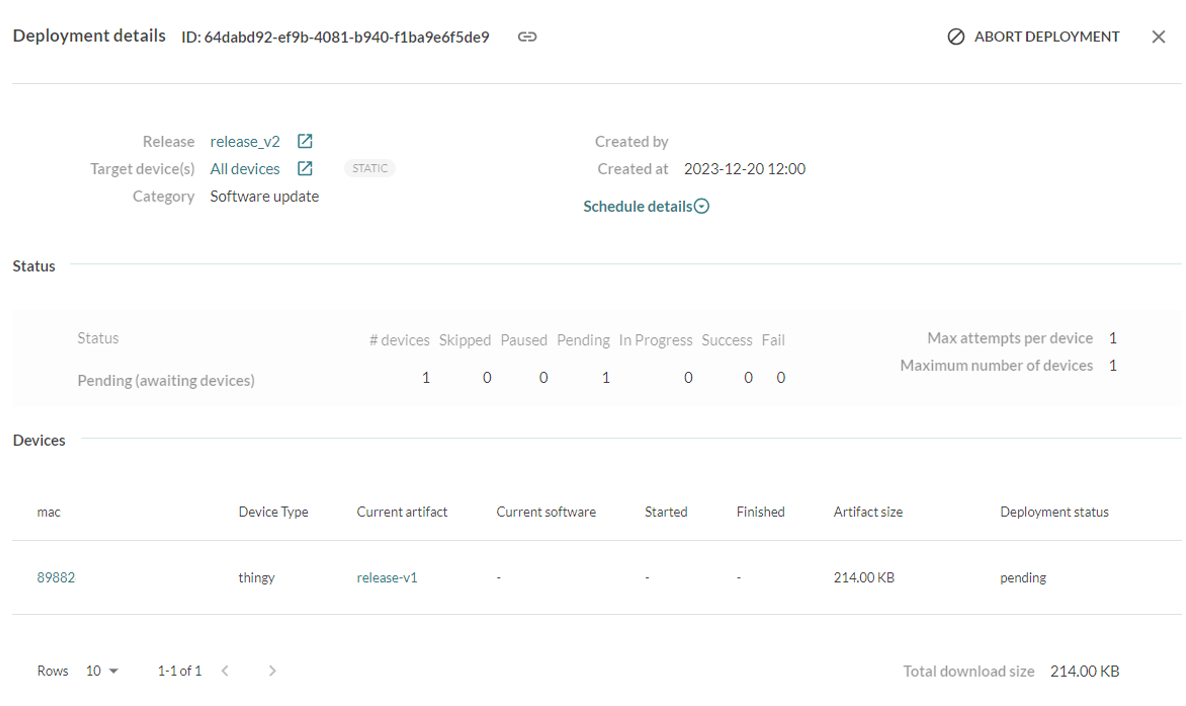
Deployment status flow in Mender dashboard.
⚙️ Configuration Options
The following configuration options are available for customizing the Mender FOTA demo:
🧩 General Options
| Config Option | Description | Default |
|---|---|---|
CONFIG_APPLICATION_VERSION | Application version reported to Mender | 1 |
CONFIG_ARTIFACT_NAME | Mender artifact name (used in artifact creation) | "release-v1" |
CONFIG_MENDER_DEVICE_TYPE | Device type used for update compatibility | "thingy" |
CONFIG_MENDER_FW_UPDATE_CHECK_FREQUENCY_SECONDS | Firmware update check interval (in seconds) | 30 |
CONFIG_MENDER_AUTH_CHECK_FREQUENCY_SECONDS | Auth check interval (when unauthorized) | 30 |
🔐 Secure Communication
| Config Option | Description | Default |
|---|---|---|
CONFIG_MENDER_URL | Mender backend URL | "eu.hosted.mender.io" |
CONFIG_NCE_MENDER_COAP_PROXY_HOST | CoAP proxy hostname provided by 1NCE | "coap.proxy.os.1nce.com" |
CONFIG_COAP_SERVER_PORT | CoAP server port (5684 if DTLS is enabled, else 5683) | Auto |
CONFIG_NCE_MENDER_COAP_URI_PATH | URI path for proxying CoAP requests to Mender | "mender" |
Unsecure CoAP Communication
By default, the demo uses 1NCE SDK to send a CoAP GET request to 1NCE OS Device Authenticator. The response is then processed by the SDK and the credentials are used to connect to 1NCE endpoint via CoAP with DTLS.
To test unsecure communication (plain CoAP), disable the device authenticator by adding the following flag to prj.conf
CONFIG_NCE_DEVICE_AUTHENTICATOR=n
📦 Ready-to-Flash Firmware for Thingy:91
For quick testing, we provide prebuilt firmware binaries that can be flashed directly to your Thingy:91 device — no build setup required.
Available prebuilt files:
| Version | Binary (.bin) | HEX (.hex) | Mender Artifact (.mender) |
|---|---|---|---|
release-v1 | release-v1.bin | release-v1.hex | release-v1.mender |
release-v2 | release-v2.bin | release-v2.hex | release-v2.mender |
👉 Flash directly using: release-v1.hex or release-v2.hex
Note: These builds enable all LTE bands, so the initial network registration may take several minutes while scanning.
1NCE Zephyr blueprint - 1NCE Memfault Demo
Overview
The 1NCE Memfault Demo enables Zephyr-based devices to send diagnostics and fault data via CoAP using the 1NCE CoAP Proxy. This is useful for tracking faults, crashes, and network issues in IoT devices. Communication can optionally be secured using DTLS.
On the Thingy:91 device, LED indicators show the following statuses:
- 🔵 BLUE – Network connected
- 🟢 GREEN – Memfault data sent successfully
- 🔴 RED – Failed to send Memfault data
🔌 Memfault Integration
To use this demo, install and enable the Memfault Plugin for 1NCE OS.
📦 SDK Requirement: nRF Connect SDK v2.8.0
▶️ Running the Demo
1️⃣ Build & Flash
Build the project for either thingy91/nrf9160/ns or nrf9160dk/nrf9160/ns or nrf9151dk/nrf9151/ns.
- Flash using VS Code for DKs or nRF Connect Programmer for Thingy:91.
- Firmware path (Thingy:91):
build/nce_debug_memfault_demo/zephyr/zephyr.signed.hex
On Windows, avoid long folder paths to prevent build errors.
Use something like
C:\dev\memfault_demo
2️⃣ Upload Symbol File to Memfault
To enable metric processing:
- Go to Memfault Dashboard > Symbol Files
- Upload:
build/nce_debug_memfault_demo/zephyr/zephyr.elf

Upload the ELF symbol file to Memfault.
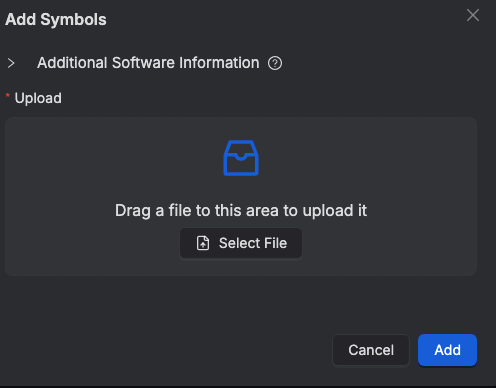
Memfault symbol file upload confirmation.
3️⃣ Authorize the Device
The device will register itself using the SIM’s ICCID as its serial number.
You’ll see it appear in the Devices view of Memfault.
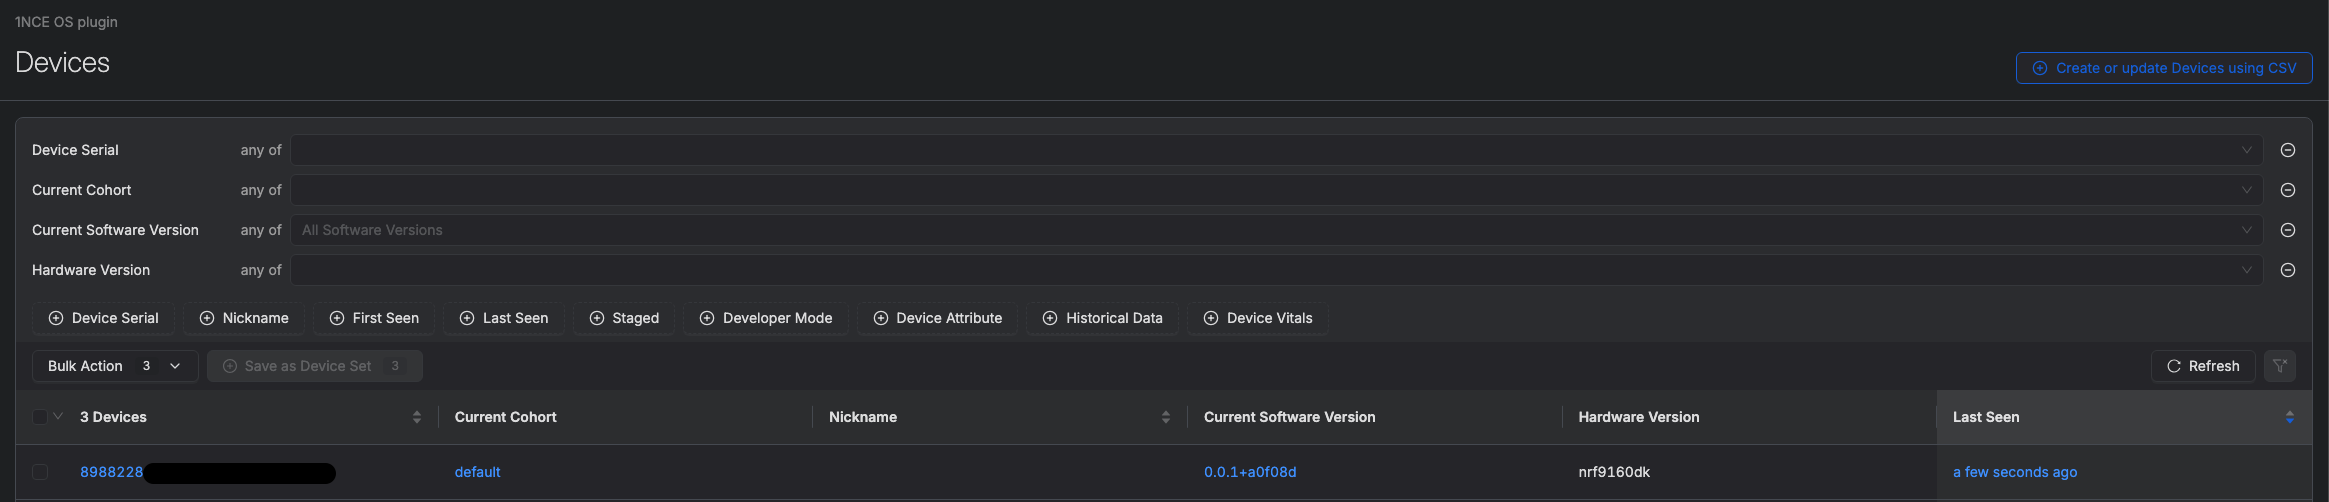
Device listed in Memfault dashboard.
4️⃣ Generate Events
On boot, two events are sent automatically:
heartbeat: Contains standard metricsreboot: Reports cause of last reboot
Use the CLI to trigger more:
nce post_chunks     # Push buffered data now
nce divby0          # Trigger division-by-zero crash
nce sw1             # Increment switch_1_toggle_count
nce sw2             # Log switch_2_toggled event
nce disconnect      # Simulate disconnection and reconnection
The overview dashboard shows a summary of recent device issues:
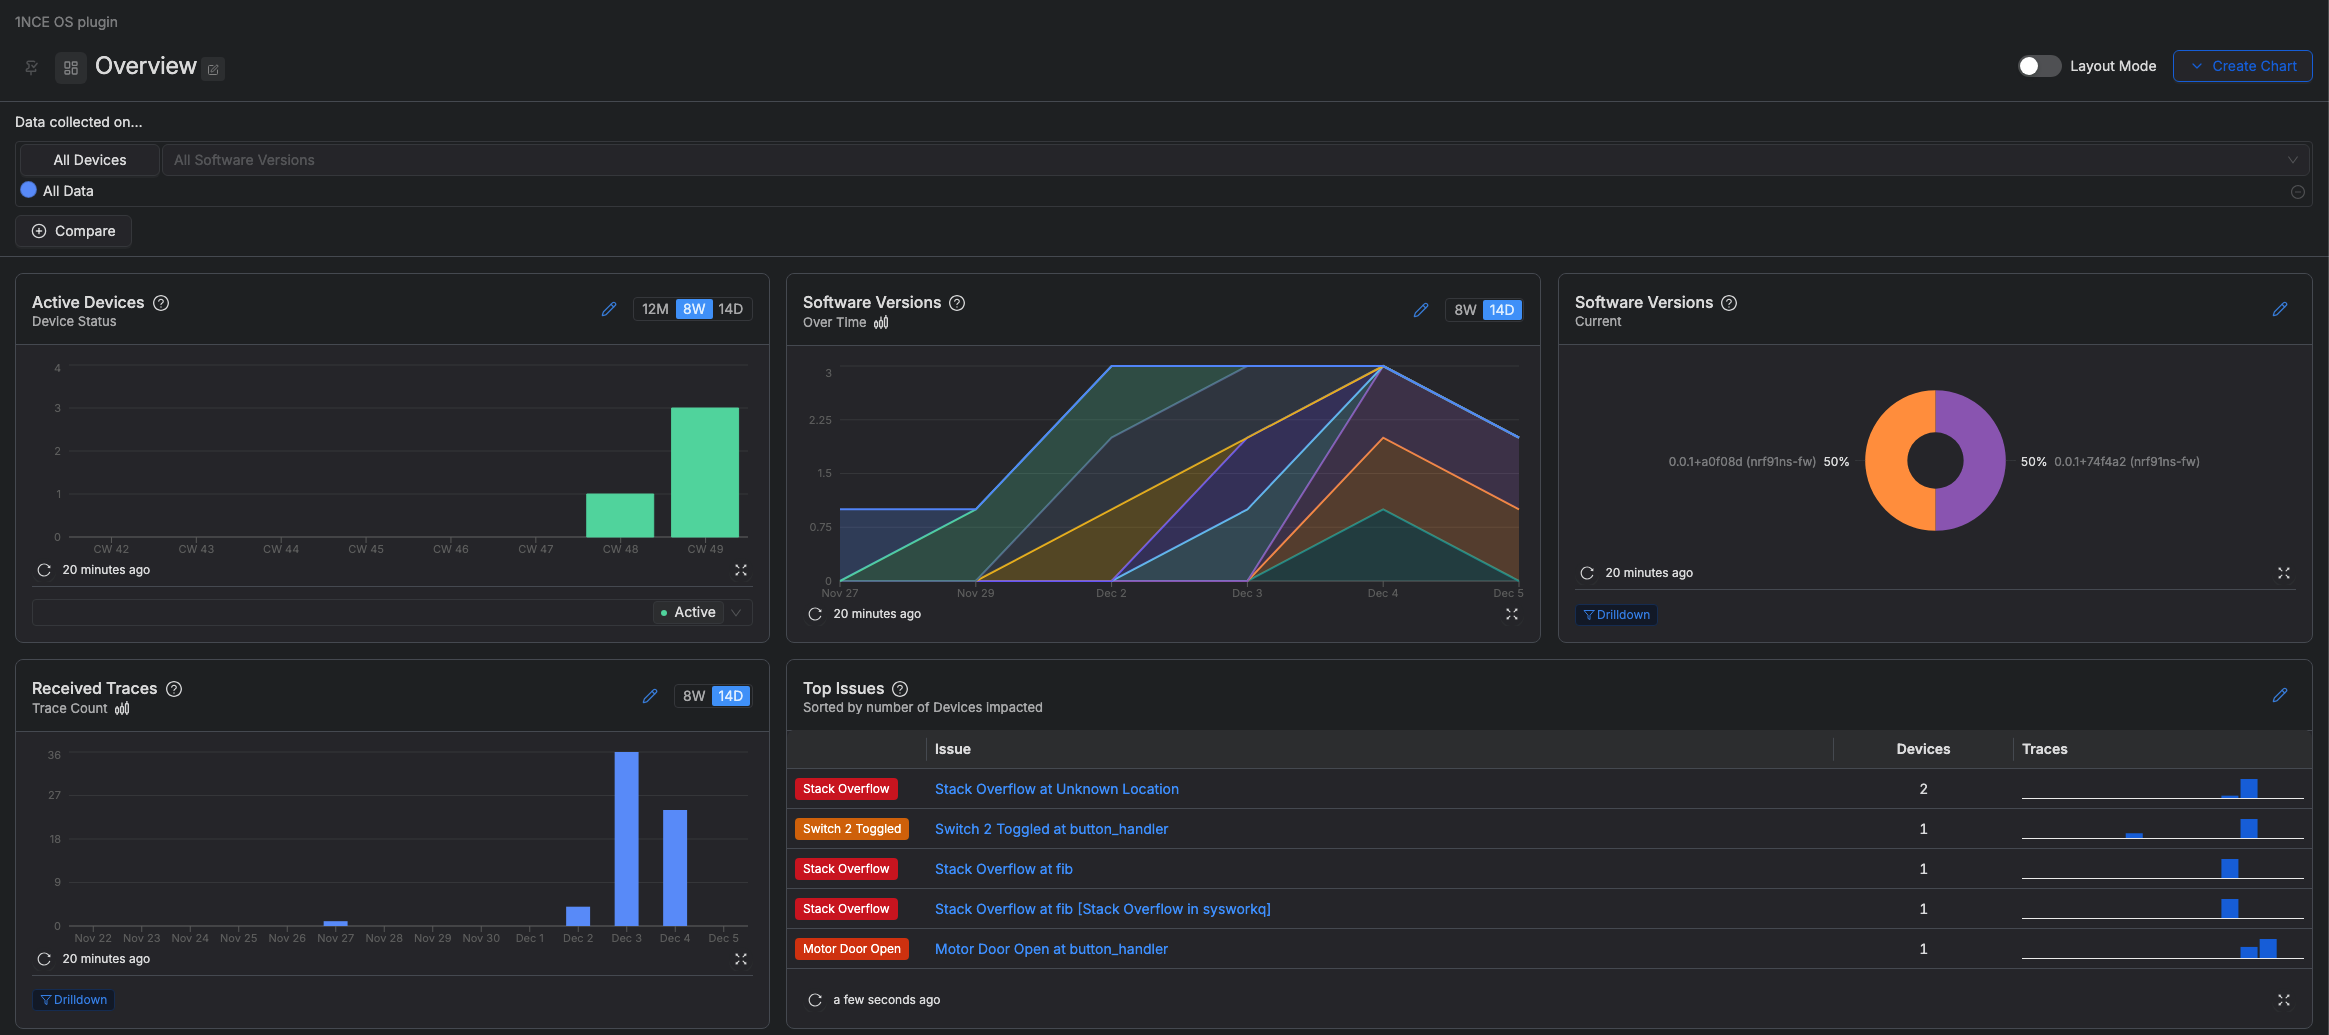
Memfault dashboard overview of device issues.
🔘 Fault Injection via Buttons
| Button / Switch | Description |
|---|---|
| Button 1 | Stack overflow |
| Button 2 | Division by zero |
| Switch 1 | Custom metric: toggle count |
| Switch 2 | Event trace: switch toggled |
💡 On Thingy:91, use nce CLI instead (only Button 1 available)
📶 Connectivity Metrics
Enabled by default with:
CONFIG_MEMFAULT_NCS_LTE_METRICS=y
CONFIG_NCE_MEMFAULT_DEMO_COAP_SYNC_METRICS=y
CONFIG_NCE_MEMFAULT_DEMO_CONNECTIVITY_METRICS=y
Standard LTE Metrics
ncs_lte_time_to_connect_msncs_lte_connection_loss_countncs_lte_tx_kilobytesncs_lte_rx_kilobytes
Additional Metrics
ncs_lte_nce_operatorncs_lte_nce_bandsncs_lte_nce_current_bandncs_lte_nce_apnncs_lte_nce_rsrp_dbm
Sample Connectivity dashboard configuration:
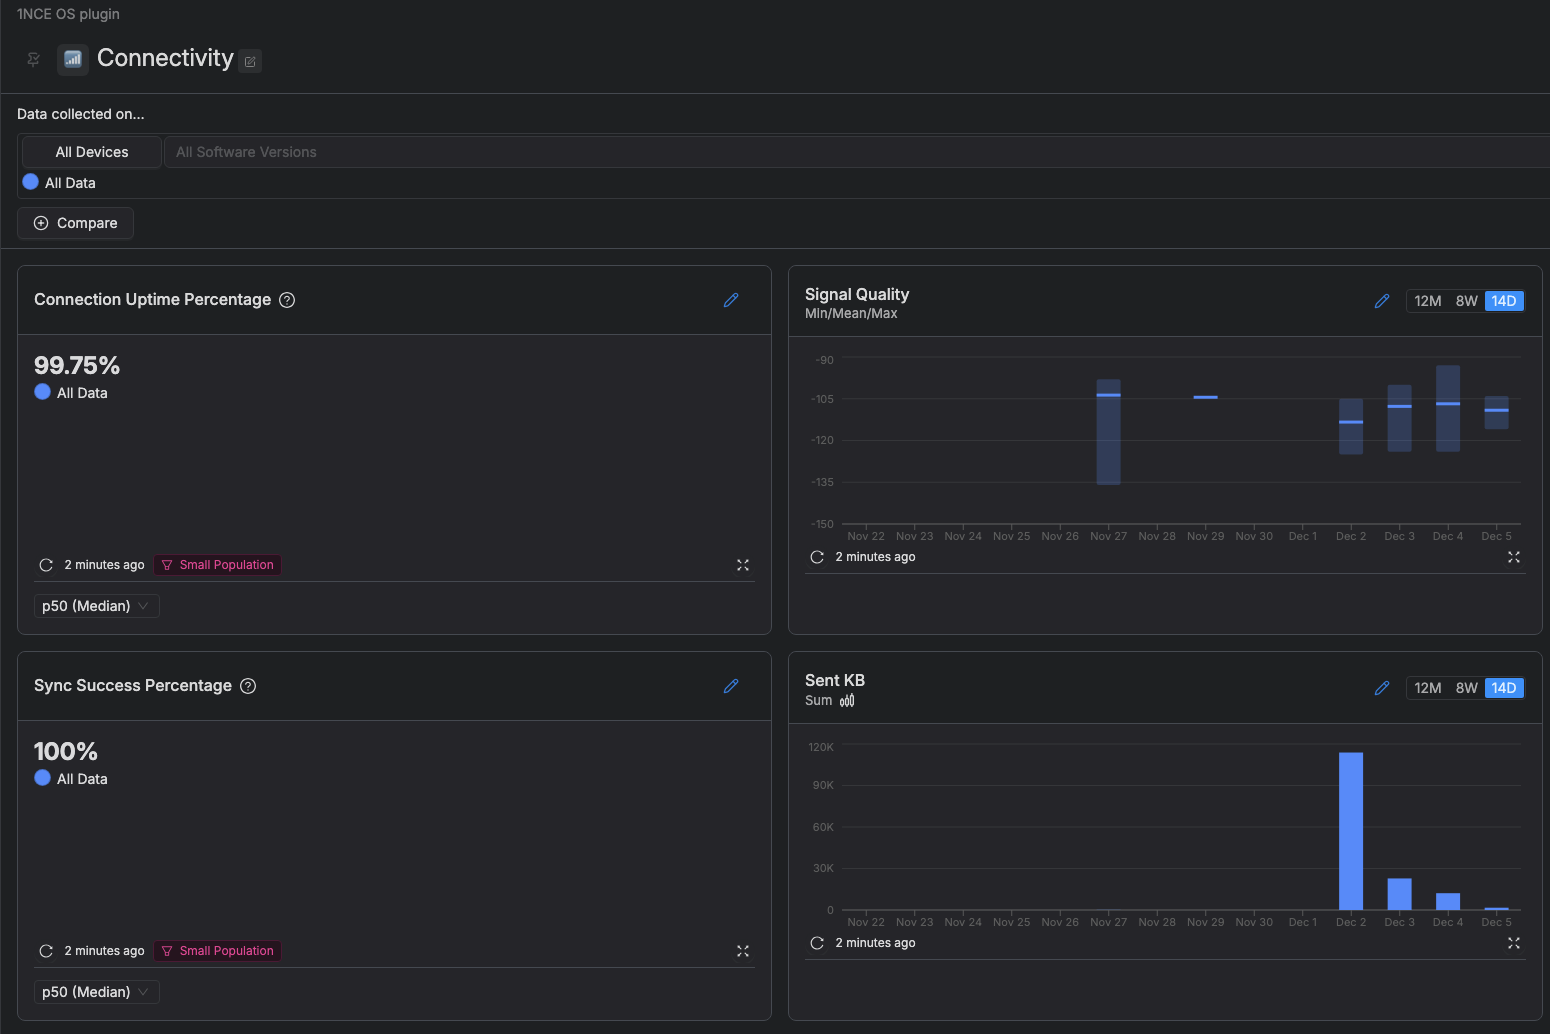
Sample Connectivity dashboard configuration
Sync Succes chart configuration:
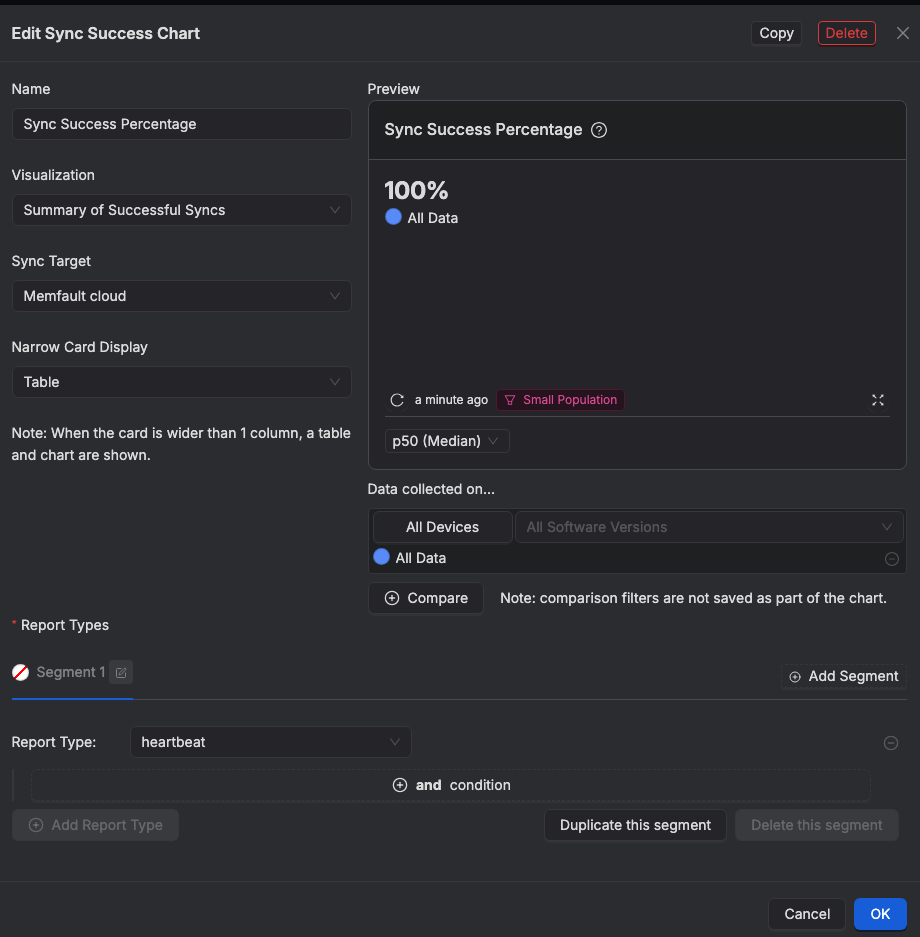
Sync Success chart configuration
To create a new metrics chart:

Create a new metrics chart
Signal quality chart configuration:
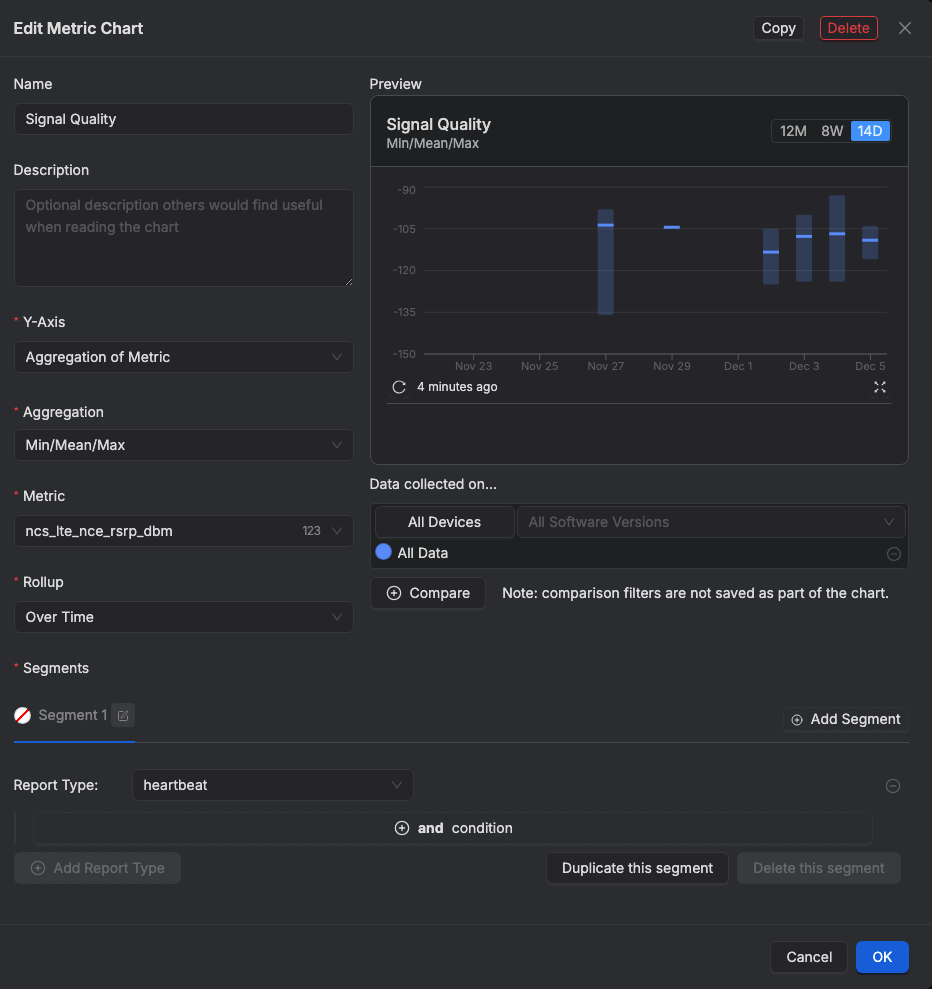
Signal quality chart configuration
Sent KB chart configuration:
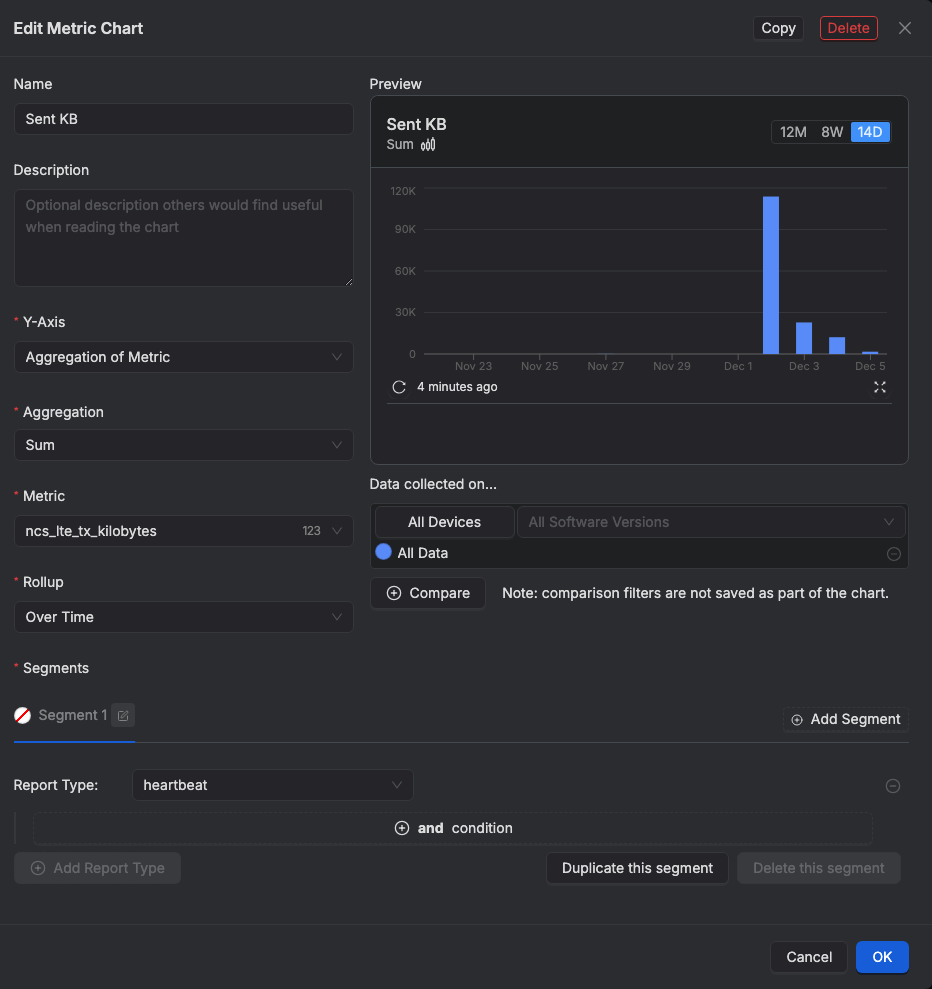
Sent KB chart configuration
🔐 DTLS Configuration
To enable secure communication:
CONFIG_NCE_MEMFAULT_DEMO_ENABLE_DTLS=y
CONFIG_NCE_SDK_ENABLE_DTLS=y
CONFIG_NCE_DEVICE_AUTHENTICATOR=y
CONFIG_NCE_SDK_DTLS_SECURITY_TAG=<your_tag>
- If onboarding is required, set
<your_tag>to an empty tag and the demo will authenticate via 1NCE automatically. - On failure (3x), re-onboarding is triggered automatically.
⚙️ Configuration Options
General Options
| Config Option | Description | Default |
|---|---|---|
CONFIG_NCE_MEMFAULT_DEMO_PERIODIC_UPDATE | Enable periodic Memfault updates | y |
CONFIG_NCE_MEMFAULT_DEMO_PERIODIC_UPDATE_FREQUENCY_SECONDS | Interval between updates (seconds) | 30 |
MEMFAULT_METRICS_HEARTBEAT_INTERVAL_SECS | Heartbeat interval (in header file) in config/memfault_platform_config.h | 30 |
CONFIG_NCE_MEMFAULT_DEMO_CONNECTIVITY_METRICS | Collect Additional connectivity metrics | y |
CONFIG_NCE_MEMFAULT_DEMO_COAP_SYNC_METRICS | Tracks successful/failed syncs | y |
CONFIG_NCE_MEMFAULT_DEMO_PRINT_HEARTBEAT_METRICS | Print heartbeat metrics to serial log | y |
CONFIG_NCE_MEMFAULT_DEMO_DISCONNECT_DURATION_SECONDS | Simulated disconnect duration | 20 |
CONFIG_NCE_MEMFAULT_DEMO_ENABLE_DTLS | Enable secure CoAP over DTLS | n |
🆘 Need Help?
Open an issue on GitHub for:
- ❗ Bug reports
- 🚀 Feature requests
- 📝 Documentation issues
- ❓ General questions
Made with 💙 by the 1NCE Team.
Updated 3 days ago